


5
INITIAL START-UP
Turn pump OFF before starting procedure.
Properly seat filter clamps and securely tighten clamp
knobs before proceeding.
Read “Warning Instructions For Clamp Assembly” decal
on tank.
Water pressure in filter must not exceed 50 PSI (345
kPa) under any circumstances.
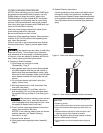
1. Open air release valve (Key No. 3, Page 12) located
on top of filter tank head.
2. Start pump.
3. When a steady stream of water comes from air re-
lease valve, close valve.
4. After filter is operating, record filter pressure gage
reading in owner’s manual for future use.
NOTICE: When installed on a new pool, filter element
may need cleaning after approximately 48 hours of opera-
tion.
NOTICE: A new filter may discharge foam upon initial
start-up. This non-toxic foam is a normal consequence
of the microban treatment process and should disap-
pear after a few minutes of operation.
NOTICE: A new or recently cleaned filter element may
pass some foreign material until it builds up a sufficient
coating to stop all “fines”. This is normal; a short opera-
tional period should correct the condition.
Check pressure gauge; if pressure has risen more than 10
PSI (70 kPa) above startup pressure, remove and clean el-
ement.
FILTER DISASSEMBLY/
ASSEMBLY PROCEDURE
Before Disassembling Filter:
1. STOP PUMP.
2. OPEN air release valve.
3. WAIT until all pressure is released
from filter tank and system before loosening clamp
knobs.
Disassembly:
1. Stop pump.
2. Open air release valve (Key No. 2, Page 10) on top
of filter tank to release all pressure from inside of
tank and system.
3. Close plumbing inlet and return valves to prevent
flooding.
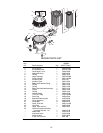
4. Remove filter drain plug (Key No. 17 or 18, Page 10)
and drain all water from tank.
5. To equalize flange stresses, loosen clamps alter-
nately (that is, on opposite sides of tank) around
tank. Remove clamps.
6. Being careful not to damage Cord ring (Key No. 23,
Page 10), lift upper tank half (Key No. 24, Page 10)
off of lower tank half (Key No. 22, Page 10).
Assembly:
1. Remove Cord Ring slowly to avoid stretching or tearing
it.
2. Inspect Cord Ring (Key No. 23, Page 10) for cuts,
nicks, etc. If damaged, replace with a new one.
3. Clean Cord Ring area of tank half (both halves) and
Cord Ring.
4. Carefully install Cord Ring and upper tank half (Key
No. 24, Page 10).
NOTICE: Be sure upper tank half contacts Cord Ring
surface evenly and seal area is clean and free from dirt.
Do not lubricate Cord Ring; lubricants may cause the
Ring to swell.
5. Install clamps. Do not tighten clamps yet.
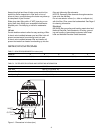
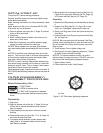
6. See Figure 3 for clamp tightening sequence. Tighten
all clamp knobs securely hand tight.
NOTICE: To equalize stresses on tank, be sure to
tighten clamps in sequence shown. DO NOT work your
way around the filter tightening adjacent clamps.
7. Open isolation valves.
8. Follow directions under “Initial Startup”.
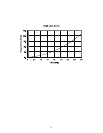
Figure 2 - 25" Filter clamp tightening sequence.
1
7
4
6
2
8
3
5
25" Filter