


portions.of the gauge
causing some error in the counts.
3
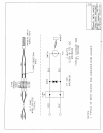
As rain is collected by the eight-inch diameter
orifice, the rain drops are directed down through the funnel and into the bucket assembly. As
soon as the bucket has collected enough rain to represent 0.01 inches (or 0.25 mm) of rain,
the bucket tips. The rain drains out through the drain collection tubes and the magnet is
moved past the reed switch. The reed switch closes momentarily, making an electrical
contact that is used in conjunction with electronic counting and recording instruments.
Chapter 4: Calibration
4.1 Factory Calibration
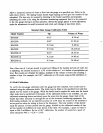
Each rain gauge is thoroughly tested before being shipped to the customer. A measured
amount of water is passed through the rain gauge to give an expected number of counts
according to the diameter of the orifice. The bucket calibration posts have screws that are
adjusted until the correct number of counts are achieved with repeated testing. The exact
number of counts or nearly the exact number are recorded for each gauge. As long as the
number of counts is within the specified accuracy of the gauge, the calibration will be
accepted. The calibration of the gauge should not change during shipping unless the gauge
becomes damaged. Checking of the gauge calibration may be made after the gauge has been
installed to ensure the accuracy of the data.
4.2 Calibration Procedure
The rain gauge calibration may be checked using a graduated burette or cylinder. Wet the
gauge thoroughly allowing water to flow through the gauge before beginning the test. The
wetting of the gauge helps compensate for water that may adhere to
allen
head set screws.
These set screws must be loosened before the knobs can be moved. The set screws are
accessible from the sides of the base. Re-tighten the set screws after leveling the gauge to
help ensure that the level adjustment will not shift due to loose screws.
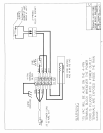
The gauge may be installed with the outer cover on or with it removed. Three screws hold
the outer cover in place. Take out these three screws to remove the cover. Carefully remove
the cover, avoiding hitting any of the internal rain gauge parts. Some of the moving parts are
tied down to prevent movement and possible damage during shipping. Remove any tape,
plastic ties, foam inserts, or other objects used to keep the tipping buckets from moving. The
bucket assembly should move easily with the packing materials removed.
Chapter 3: Operation
The rain gauge operation is relatively simple.
The leveling knobs located above the mounting feet are secured using