


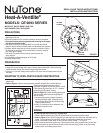

COMPLETING INSTALLATION
1. Reinstall the heater unit and tighten four (4) screws securely.
2. Plug fan and heater assemblies to receptacles on junction box cover.
3. Install a 100 watt lamp in light socket and 7 watt lamp in night light socket.
4. Place grille over grille mounting screws and tighten.
5. Check out all functions for proper operation.
INSTALLATION IN EXISTING CONSTRUCTION
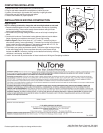
Refer to Figure 5.
NOTE: In existing construction, hanger bar and mounting brackets are not used.
1. Determine desired location of heater. Area above heater must be free of plumbing
and electrical wiring. There must be enough clearance above ceiling for heater
housing and installation of duct and wiring.
2. Drill a small hole up through ceiling and insert a wire or nail to help in locating from
above.
3. Locate hole from above. Center heater housing between joists and use the bottom
flange of housing as a template to mark cutout. Cut out hole in ceiling.
4. Refer to Figure 3. Secure short pieces of 1" x 3" lumber (
3
⁄
4
" nominal) to joists on
either side of opening. Leave approximately
1
⁄
2
" between top of ceiling so that flange of
heater housing can slide under spacers. If joist spacing is greater than 16" O.C., cut
spacers of 2" x 4" lumber to fit between housing and joists.
5. Place heater over opening and between spacers. From below, align housing so flange
is flush with finished ceiling. Secure to spacers with nails or wood screws though
keyhole slots. NOTE: If necessary, housing can be installed from below by removing
vent blower, vent housing, and outlet box.
6. Install 4" duct and refer to previous section of these instructions for Wiring and Completing Installation.
FIGURE 5
2-1/2"
7-5/8"
5-1/2"
4820 Red Bank Road, Cincinnati, OH 45227
Product specifications subject to change without notice. Printed in U.S.A., Rev. 04/05, Part No. 85917