


8
GROUNDING - All units must be grounded. Dri ve
a 3/4” or 1” copper pipe or rod into the ground close to
the generator. The pipe/rod must penetrate moist
earth. Connect an approved ground clamp to the pipe.
Run a 10-gauge wire from the clamp to the generator
grounding screw located at the rear of the generator.
Do not connect to a water pipe or a ground used by a
radio system.
CAUTION: The engine has been shipped without
oil. Fill the crankcase with oil before trying to start.
OPERATING SPEED
The generator must be run at the correct speed in
order to produce the proper electrical voltage and
frequency. The speed of the engine was carefully
adjusted at the factory so that the generator produces
the proper voltage and frequency.
The output voltage should be checked to ensure
the generator is working properly before connecting a
load to the generator. Failure to do so could result in
damage to equipment plugged i nto the unit and
possible injury to the individual.
All engines have a tendency to slow down when a
load is applied. When the electrical load is connected
to the generator, the engine is more heavily loaded,
and as a result the speed drops slightly. This slight
decrease in speed, together with the voltage drop
within the generator itself, results in a slightly lower
voltage when the generator is loaded to its full capacity
than when it is running with no load. The slight
variation has no appreciable effect in the operation of
motors, lights and most appliances. Electronic
equipment and clocks will be affected if correct RPM is
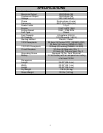
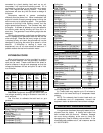
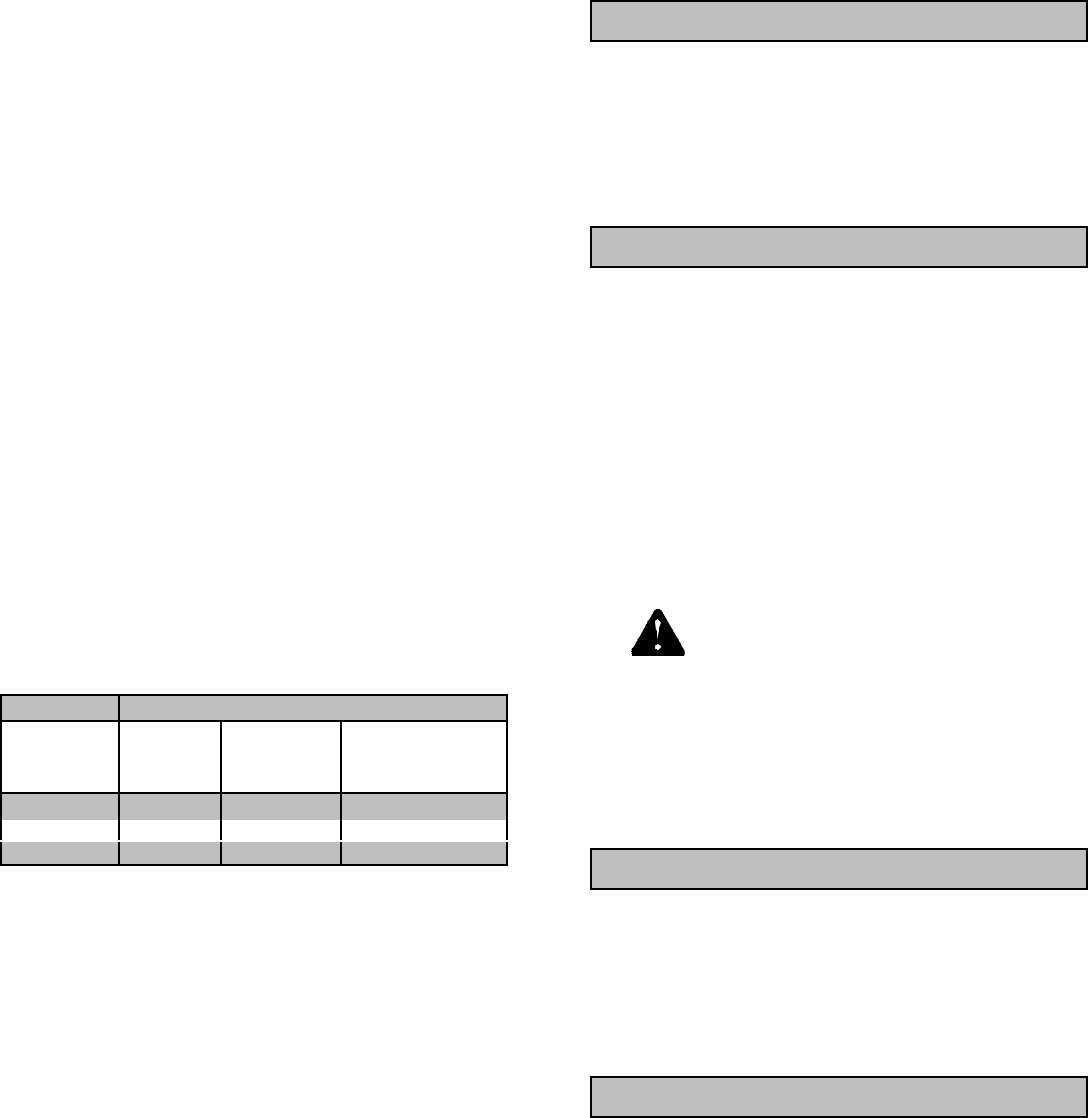
not maintained. See Load vs. Output chart.
Load Output
Percent of
Generator
Output
Speed
(RPM)
Frequency
(Hz)
Generator
Voltage at 120V
Receptacle
0 % 3780 63.0 129V
50 % 3600 60.0 120V
100 % 3480 58.0 112V
Output voltage should be periodically checked to
ensure continued and proper operation of the
generator. The voltage can be checked with a portable
voltmeter. Frequency can be checked by using a
electric clock, with a sweep second hand. Timed
against a wristwatch or stopwatch. The clock should
be correct within +/- 2 seconds per minute. A qualified
technician should accomplish engine speed
adjustments.
BEFORE STARTING
1. Make sure the generator is positioned on a firm
l eve l su rface .
2. Check the crankcase for oil and maintained at a
proper level.
3. Check fuel level and fill tank 7/8 full with diesel
fuel. Never fill fuel tank completely to the top.
Always wipe up and remove any spilled diesel
fuel.
4. Make sure that the exhaust fumes are directed
away from people.
ELECTRIC START OF ENGINE
1. Disconnect all loads to generator.
2. Turn gas line valve to ON position.
3. Turn the ignition key to the START position.
4. If the engine does not start after 10 seconds,
wait 15 seconds before attempting to start again.
5. If the engine will not start consult the trouble
shooting table (page 10).
M ANUAL START OF ENGINE
1. Disconnect all loads to generator.
2. Turn fuel line valve to ON position.
3. Turn the ignition key to the RUN position.
4. Grasp the recoil handle and pull until a strong
resistance is felt.
5. Let the recoil handle return to the initial position.
6. Push down the decompression lever. The lever
is l ocated on top of the engine and is colored
RED.
7. Pull out the recoil handle briskly with both
hands.
8. If the engine will not start consult the trouble-
shooting table (page 10).
CAUTION A battery must always be
connected to the battery cables, or engine damage
could result.
ENGINE SHUTDOWN
1. Disconnect all loads from generator.
2. Turn the ignition key to the OFF position.
3. Turn the fuel valve to the OFF position.
ENGINE CARE
Refer to your Hatz Owner’s Manual for proper care
and maintenance.
Refer to your Hatz Owners manual for fuel and oil
i nformati on.
IMPORTANT: It is possible that the fuel line will
need to be bled the first time the fuel tank is filled.