


USER MANUAL
ENGLISH
SR 1100S B 146 2494 000(2)2007-02 A
19
SIDE BROOM HEIGHT CHECK AND
ADJUSTMENT
NOTE
Brooms with harder or softer bristles are available.
This procedure is applicable to all types of brooms.
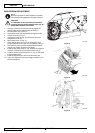
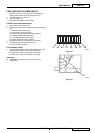
Check the side broom distance from the ground, according
to the following procedure:
Drive the machine on a level ground and lower the side
brooms.
Keep the machine stationary and turn on the side
brooms for a few seconds.
Lift the side brooms, then move the machine and turn
it off.
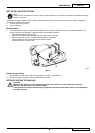
Check that the side broom prints are as shown in the
fi gure (A and B, Fig. 7).
If the print is not within specifi cations, adjust the broom
height, according to the procedure shown in step 2.
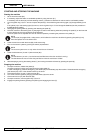
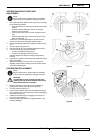
Engage the parking brake with the pedal (3) and the lever
(4).
Turn the ignition key (72) to "0".
Loosen the knob (A, Fig. 8) positioned above the broom.
Turn the knob (B, Fig. 8) and remind that:
It must be screwed to lift the broom;
It must be unscrewed to lower the broom.
After the adjustment, hold the knob (B) and tighten the
knob (A).
Perform step 1 again to check the proper adjustment of the
side broom height.
When the brooms are too worn and can no longer be
adjusted, replace them according to the procedure shown
in the relevant paragraph.
SIDE BROOM REPLACEMENT
NOTE
Brooms with harder or softer bristles are available.
This procedure is applicable to all types of brooms.
CAUTION!
It is advisable to wear protective gloves when
replacing the side brooms because there can be
sharp debris between the bristles.
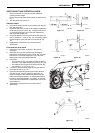
Drive the machine on a level ground and engage the
parking brake with the pedal (3) and the lever (4).
Turn the ignition key (82) to "0".
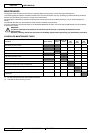
Lay the hand inside the side broom and press the tabs (A,
Fig. 9) inwards, then remove the broom (B) by disengaging
it from the four pins (C).
Install the new side broom by engaging it on the pins (C,
Fig. 9) and on the tabs (A).
Check and adjust the side broom height as shown in the
previous paragraph.
1.
•
•
•
•
2.
3.
4.
5.
•
•
6.
7.
1.
2.
3.
4.
5.
S311394
Figure 7
S311395
Figure 8
S311396
Figure 9