


3. If you choose to use the auto-fill feature, connect the fill-hose to the hose connection over the solution
tank fill hole. Turn on the water source, and allow the tank to fill with solution. NOTE: do not turn the
water on to full pressure; water flowing into the auto-fill system does not need a lot of pressure behind it.
If you choose not to use the auto-fill system, just fill the tank with water and cleaning chemical. Follow
chemical directions regarding dilution and mixing. Do not use harsh chemicals as they may damage seals
in pumps and valves, and cause the pump to wear prematurely. NOTE: using warm water in the tank
may improve the efficiency of the heat exchanger when cleaning with heat, but never use water with a
temperature exceeding 54
°
C/130
°
F.
4. Select ‘HEAT” by moving the HEAT/HIGH PRESSURE switch towards the thermometer symbol. NOTE:
this switch is off when it is set to the middle position and neither the high-pressure pump nor the heater is
selected. When set to the bottom position, the heat is selected; the red light will come on and stay on.
The heater and the high-pressure pump can not operate at the same time.
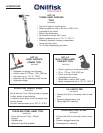
5. Plug in the power cord.
6. Press the ‘power prime’ pedal (located on the rear, lower left of the machine) for a moment to release
any back pressure in the pump lines.
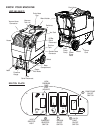
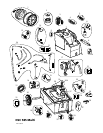
7. Connect the solution hose to the quick disconnect on the short hose from the 7 bar pump on the front
of the base, and connect the vacuum hose to the hose barb on the top, left of the recovery tank.
Connect the other ends of both hoses to the cleaning tool.
8. Turn on the 7 bar “demand” pump (4). NOTE: the ‘demand’ pump will not run until pressure is
released.
9. Spray for a few seconds to fill the lines with solution. Wait two minutes to allow the heater to reach
temperature.
10. Begin cleaning. It may take several cycles to heat the lines and the cleaning tool.
11. If you are not using the auto-fill or auto-dump features, turn off the pump and the vacuum when the
solution tank gets low. Fill the solution tank, and empty and clean the recovery tank. If you are using
the automatic features, your machine will empty and fill itself -- no need for you to stop working.
12. When finished with the job, turn off the water source, if using the auto-fill feature. Remove the auto-fill
hose from the hose connection on the machine. Vacuum the remaining solution from the solution holding
tank into the recovery tank. Run a few gallons of clean water through the system. Drain the
recovery tank by placing the drain hose over a floor drain, toilet, or tub and removing the cap. You can
clean the tank at this time with clean water. When the tank is empty, cap the drain hose and place it
back in the hook and loop holder. Disconnect the hoses from the cleaning tool, and reel them up onto the
hose spool.
13. Unplug the power cords. Clean and dry the machine and the tool.
LOW PRESSURE AND HEAT continued
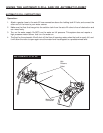
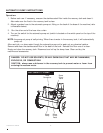
NOTE: before servicing any component in the base cabinet, remove the hoses and spool
before opening the tanks. Refer to the instruction on page 3.
DANGER: always unplug the machine from the electrical outlet(s) before
cleaning or maintaining.