


A-12 - FORM NO. 56041541 - AquaRide
™
SE, AquaRide
™
SE AXP / BRX 700 series
A-12 / ENGLISH
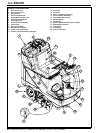
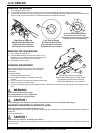
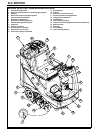
REMOVING THE BRUSHES
1 Turn the Master Key Switch (J) OFF.
2 Loosen the Black Knob (A) on top of the idler assembly and remove the idler assembly. Slide the brush out of the brush deck housing.
3 To reinstall, slide the brush into the housing, lift slightly, push and turn until it seats. NOTE: Make sure Slots (B) in end of Brush line up with and seat
fi rmly on Lugs (C) on the Drive End Assembly. Re-install the idler assembly and tighten Black Knob (A).
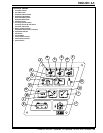
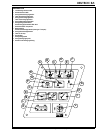
REMOVING THE VACUUM SHOES
1 Turn the Master Key Switch (J) OFF.
2 Loosen the Black Knob (D) on the back of the scrub deck. Lift the
Bar (E) up and remove. Slide the vac shoe out of the shoe support
weldment (F). Procedure is the same for both vac shoes.
3 Reinstallation is reverse of removal.
5 Check the fl uid level in all battery cells after charging the batteries. Add distilled water, if necessary, to bring the fl uid level up to the bottom of the fi ller
tubes.
WARNING !
Do not fi ll the batteries before charging.
Only charge batteries in a well-ventilated area.
Do not smoke while servicing the batteries.
CAUTION !
To avoid damage to fl oor surfaces, always wipe water and acid from the top of the batteries after charging.
CHECKING THE BATTERY ELECTROLYTE LEVEL
Check the electrolyte level of the batteries at least once a week.
After charging the batteries, remove the vent caps and check the electrolyte level in each battery cell. Use distilled water to fi ll the batteries to the bottom of
the fi ller tube.
Do not over-fi ll the batteries!
CAUTION !
Acid can spill onto the fl oor if the batteries are overfi lled.
Tighten the vent caps. If there is acid on the batteries, wash the tops of the batteries with a solution of baking soda and water (2 tablespoons of baking soda
to 1 quart of water).
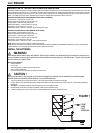
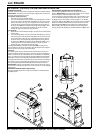
CHARGING THE BATTERIES
Charge the batteries each time the machine is used, or whenever the
Battery Condition Meter (K) is showing a yellow, red or fl ashing red
indicator light(s).
To Charge the Batteries...
1 Depress the Battery Disconnect (13).
2 Open the Battery Compartment Cover (16) to provide proper
ventilation.
3 Push the connector from the charger into the Battery Connector (22).
4 Follow the instructions on the battery charger.
F
E
D
View from left rear of machine
Ansicht der Maschine von links hinten
Vue arrière gauche de la machine
Zicht linker achterkant van machine
Right Side of Machine
Rechte Seite der Maschine
Côté droit de la machine
Rechter kant van machine
B
C
End View of Brush
Endansicht der Bürste
Vue latérale de la brosse
Eindaanzicht van borstel
End View of Drive End Assembly
Endansicht der Antriebseinheit
Vue latérale du dispositif d'entraînement
Eindaanzicht van aandrijfuiteinde
A