IM25OM-1/2000-250
4
Operating Instructions
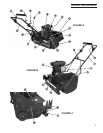
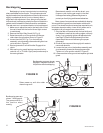
1. Unlock Parking Brake (9, Fig. A) by moving lever
forward.
2. Pull Drive Bail (15, Fig. A) slowly back to handle to
move forward. CAUTION: Make sure your path is
clear before moving forward.
3. Adjust Throttle Control to desired mowing speed.
4. Engage Reel Drive Lever (16, Fig. A and B) to start
mowing.
5. Release drive bail slightly from handle to disengage
reel.
6. Release drive bail completely to stop the mower
forward movement.
7. To shut off mower, pull throttle control all the way
back to slow, push ignition switch to off and
engage parking brake.
Maintenance
GENERAL
1. Empty basket of clippings periodically to prevent
spilling.
2. After each mowing session, clean clippings out of
basket, off reel and all other surfaces to prevent
corrosion.
3. Inspect reel and bearing surfaces for foreign material
that might prevent reel from rotating freely and clean
as necessary.
4. Follow engine manufacturers recommendations
carefully to prolong engine life.
LUBRICATION
There are Zerk Grease fittings (17, Fig. B) on each
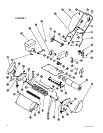
end of the reel and on each Roller Adjuster (18, Fig. C).
Use a lithium base type grease at these locations every 8
hours of operation. Use a light machine oil at all pivot
points every 30 hours of operation.
Adjustments
CONTROLS
Adjustment of control cables have been made at
the factory before shipment. If additional adjustment is
needed, move adjusting nuts at the machine end of the
cables.
HEIGHT OF CUT
Cutting height should be preset by the dealer
according to ordering instructions prior to delivery. If a
change in cutting height is required, the following proce-
dure must be followed:
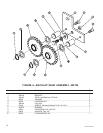
1. There are two positions available for the Rear Roller
Assembly (19, Fig. A). The bearings for the rear
roller shaft must be located in the lower position if
the cutting height is over 1 and the upper position if
the cutting height is 1 or less. Disassembly of the
rear roller assembly is necessary to change the
bearing location. See Figure 4 for reference.
Reel blades are sharp! Never attempt to
adjust cutting height of reel to bed knife
while the engine is running.
2. Adjust cutting height by loosening the top and
bottom Adjusting Nuts (20, Fig. C) which hold roller
adjusters for the Front Roller (21, Fig. B). It is
important to get roller adjusted the same height on
each end so that there will be uniform cutting the
entire width of the mower. Do not adjust by sight.
3. After loosening adjusting nuts on each side, place a
board or gauge plate of the desired height under bed
knife back bar and then tighten nuts.
REEL TO BED KNIFE
The Reel Adjustment Bolt (22, Fig. C) regulates the
distance from the bed knife. To reduce the distance, turn
the locking hex nut on each side of the reel up. Proceed
slowly and do not over adjust. Turn about 1/8 of a turn to
start with. Do not get the reel so tight that it is hard to
turn by hand. A too tight reel will cause excessive wear.
The reel should wipe or lightly touch the bed knife.
Check to see that the blades are cutting the paper all
the way across. Tighten lock nuts.
Use heavy gloves and be carefulblades
are sharp.
REEL END PLAY ADJUSTMENT
As the reel is used, normal wear of the reel bearings
will cause end play. This condition could cause uneven
wear to moving parts and uneven cutting of turf.
Test for end play periodically by trying to move the
reel from side to side in the frame. If there is any move-
ment, adjust by loosening the lock nut (23, Fig. B) on the
adjustment bolt, located inside the right end of the reel.
Turn adjustment bolt in one half turn or less. Do not over
tighten as this will cause excessive bearing wear. Test
again for end play. If reel is rotating freely and no end
play can be detected, retighten the lock nut on the
adjusting bolt.


