


ASSEMBLY
4
F-041019C
Your Snowthrower was completely assembled at the factory,
except for the upper handle assembly.
Shipping Carton
Carefully remove complete unit from carton. Make sure parts bag
and all components have been removed before discarding
carton.
The shipping carton contains the following items:
S Snowthrower housing, with lower handles attached.
S Upper handle loosely attached to lower handle by the wire
harness.
S Key, found in rear of control bar.
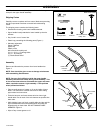
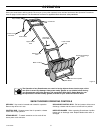
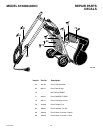
S Plastic bag, containing the following parts (Figure 1):
S Warranty registration
Owner’s Manual
Spare Key
Plastic probe
Mini wrench/drive pulley tool
(2) 1/4 - 20 x 1 1/4 carriage bolts
(2) 1/4 - 20 locknuts
(1) Plastic Strain Relief
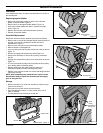
Assembly
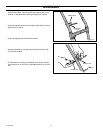
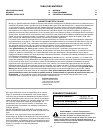
Remove and discard wire protector from lower handle tube.
Figure 2.
NOTE: Care should be given as not to damage wire harness
while assembling Snowthrower.
NOTE: You may find it difficult to slide the upper handle
assembly into the lower handle during initial assembly. This
is due to the close tolerance fit between the upper and lower
tubes, required to ensure a rigid assembly. If this problem
arises proceed as follows:
S Place a small amount of grease or oil on the inside of lower
tubes. This will ensure a smooth and even fit when sliding
upper tubes into lower tubes.
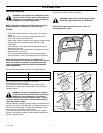
S Fold wire harness, and insert excess wire into lower right
handle tube. Put as much of the wire harness as possible into
lower tube.
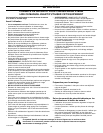
S While holding lower grip firmly, carefully slide the right and left
upper handle tubes into lower handle tubes until holes are
aligned evenly on both sides. DO NOT DAMAGE WIRE
HARNESS. Figure 3.
S Wipe off any excess grease or oil.
Plastic Probe
Spare Key
Locknuts
Mini Wrench/Drive
Pulley Tool
Plastic Strain Relief
Carriage Bolts
Figure 1
Plastic Wire
Protector
Lower Handle Tube
Figure 2
Figure 3
Upper Handle
Tube
Lower Handle
Tube
Lower Handle
Grip