


3
SECTION 3: INSTALLATION
WARNING: Before beginning installation,
place the tractor on a firm and level surface,
set the parking brake, place the PTO in the
disengaged (OFF) position, stop the tractor’s
engine and remove the ignition key to
prevent unintended starting.
WARNING: Cutting blades are sharp.
Always protect hands by wearing heavy
leather work gloves to grasp blades.
Installing the Blades
IMPORTANT:
The blades included in this kit
are NOT compatible with the deck spindles
found on Cub Cadet model LT 1022 lawn
tractors and can NOT be safely installed and
used as part of this mulch kit. Contact your
Cub Cadet dealer for more information on
mulch kits for Cub Cadet lawn tractors.
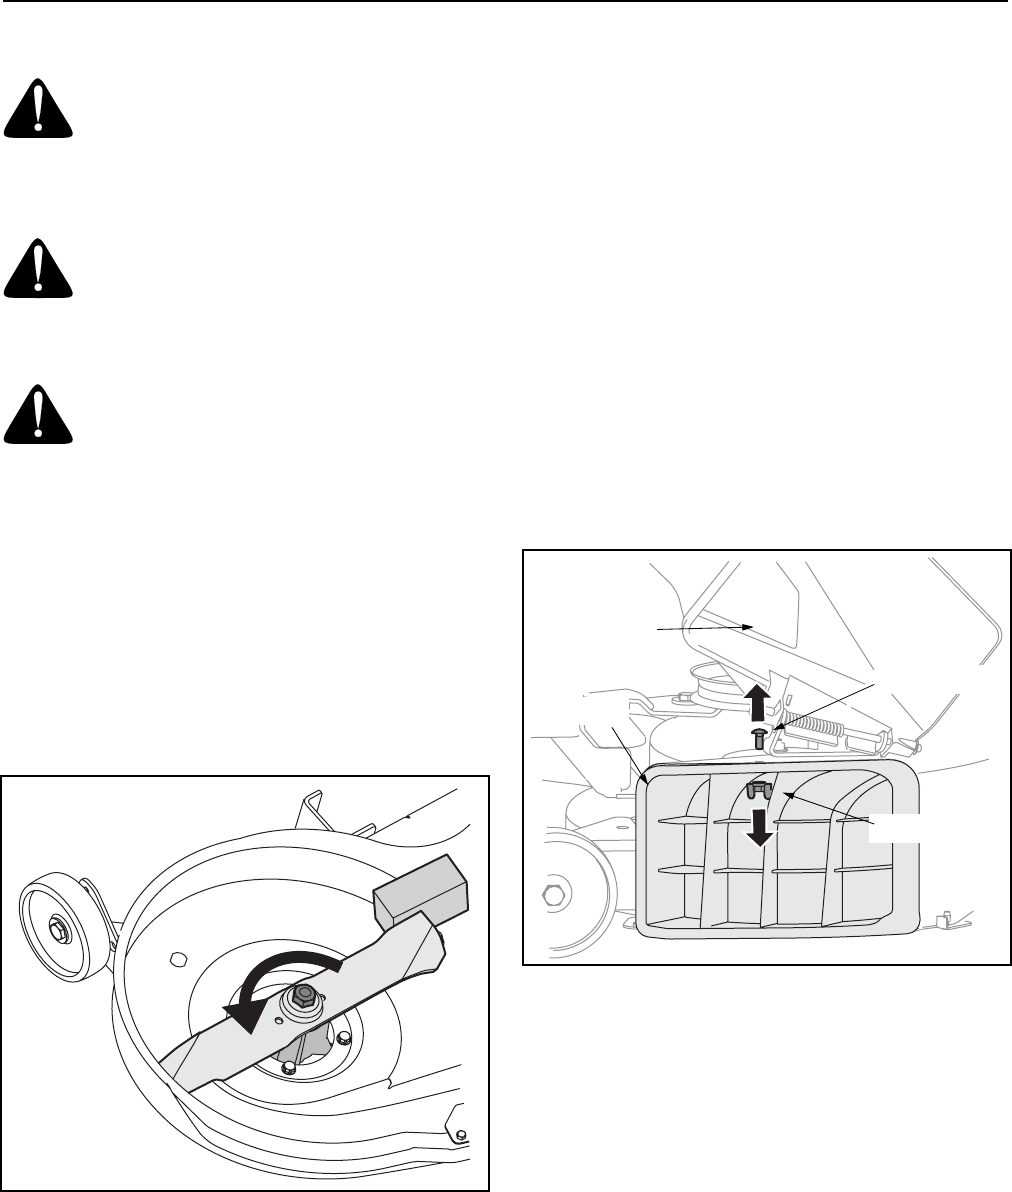
1. Remove the cutting deck from beneath the tractor
as instructed in your tractor’s Operator’s Manual,
then gently flip the deck over to expose its
underside,
2. Place a block of wood between the deck housing
baffle and the cutting blade to act as a stabilizer,
then use a wrench to remove the hex flange nut that
secures each blade to its spindle assembly. Refer
to Figure 2.
Figure 2
IMPORTANT:
The hex flange nuts have a right-handed
(normal) thread pattern. Do NOT attempt to force the
nuts in the opposite direction. Doing so may damage
the nut.
3. Replace the blades with the blades included in the
kit. Be sure to install each blade with the side
marked ‘‘Bottom’’ (or with a part number stamped in
it) facing the ground when the mower is in the
operating position. Be certain to mount the SHORT
BLADE to the CENTER SPINDLE.
Refer to Figure 1.
IMPORTANT:
Use a torque wrench to tighten each blade
spindle’s hex flange nut to between 70 ft-lb and 90 ft-lb.
Inserting the Mulch Plug
1. Remove the carriage screw and plastic wing nut
from the mulch plug.
2. Pivot the discharge chute upward as shown in
Figure 3 and carefully insert the mulch plug into the
discharge chute opening.
3. Reinsert the carriage screw down through the deck
surface and mulch plug and secure it in place with
the plastic wing nut removed earlier. See Figure 3.
Figure 3
NOTE: It is NOT necessary to remove the discharge
chute to operate the mower with the mulch kit installed.
It is also unnecessary to change the mower blades
should you choose to operate the mower without the
mulch plug installed.
IMPORTANT:
On older model decks where a square
hole is not present to insert the carriage screw, mark
the location with a drift and use a 3/8”drill bit to create a
round hole in its place.
Discharge Chute
Mulch Plug
Carriage Screw
Plastic Wing Nut