


11
10
OPERATING INSTRUCTIONS
A
B
Do not cut down a
tree during high or
changing winds or if there is a danger to
property. Consult a tree professional.Do not
cut down a tree if there is a danger of
striking utility wires; notify the utility
company befor
e making any cuts.
WARNING:
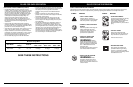
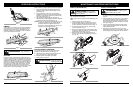
FELLING
Felling is the term for cutting down a tree. Small trees up
to 6-7 inches (15-18cm) in diameter are usually cut in a
single cut. Larger trees require notch cuts. Notch cuts
determine the direction the tree will fall.
NOTE: Direction of fall (B) is controlled by the notching
cut. Before any cuts are made, consider the
location of larger branches and natural lean of the
tree to determine the way the tree will fall.
A retreat path (A)
should be planned
and cleared as necessary before cuts are
started. The retreat path should extend
back and diagonally to the rear of the
expected line of fall, as illustrated in Fig. 8.
WARNING:
If felling a tree on
sloping ground, the
chain saw operator should keep on the
uphill side of the terrain, as the tree is likely
to roll or slide downhill after it is felled.
CAUTION:
Fig. 8
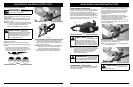
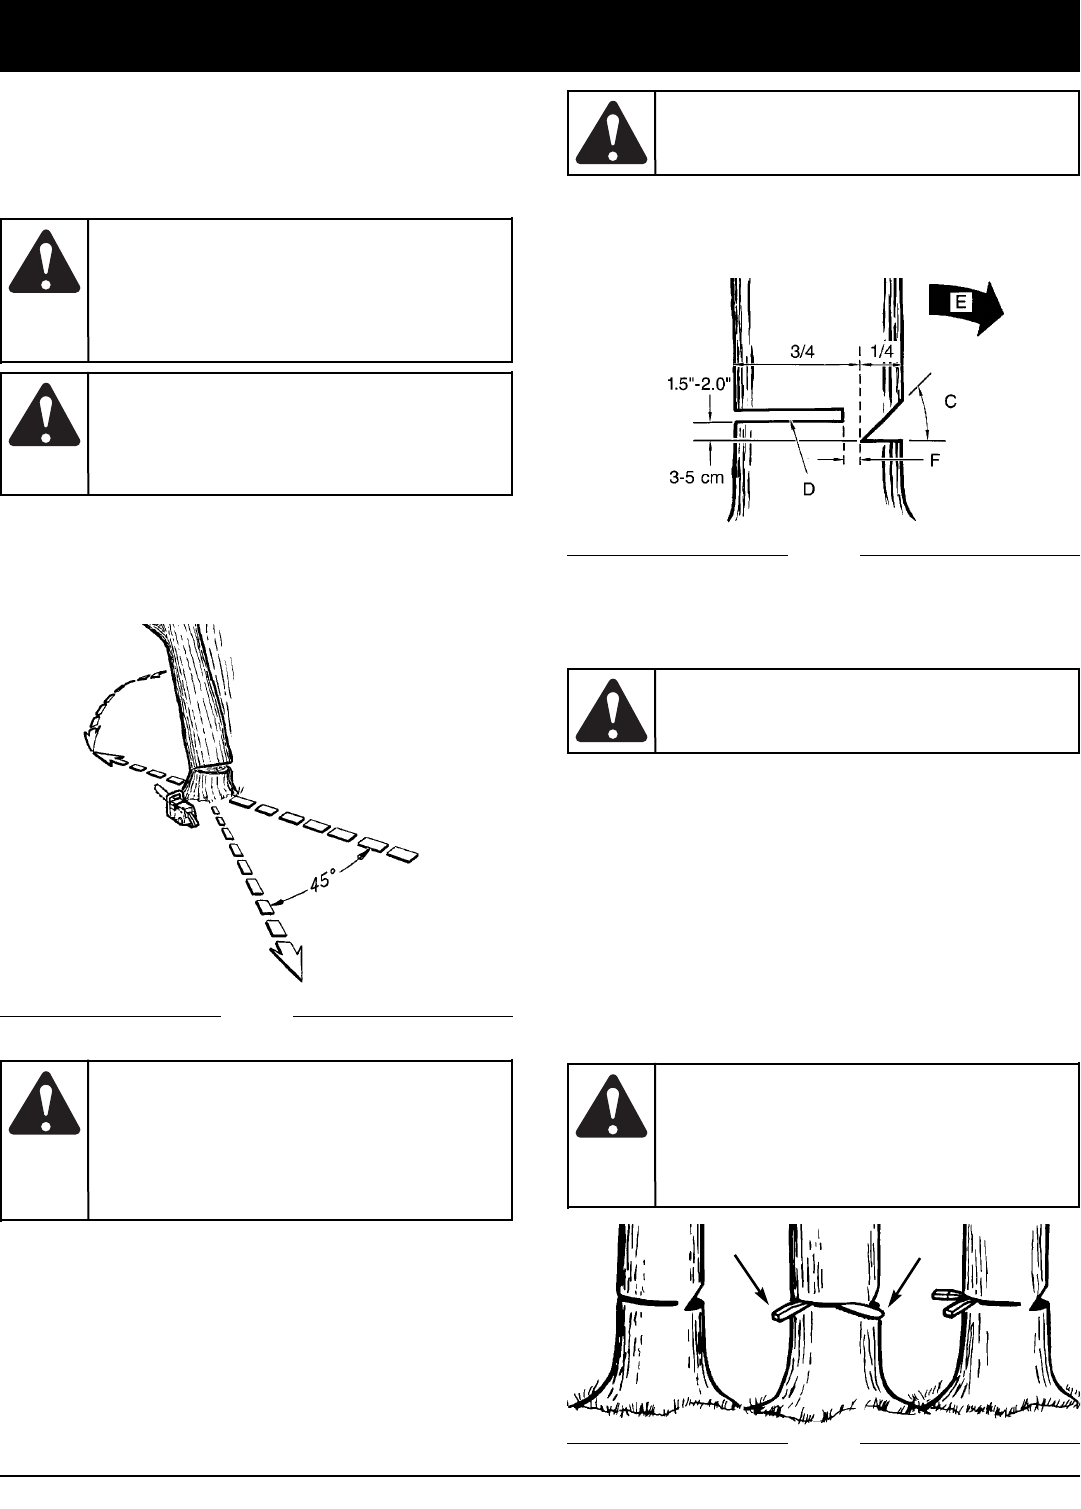
Fig. 9
Normally felling consists of 2 main cutting operations,
notching (C) and making the felling cut (D).
Start making the upper notch cut (C) on the side of the
tree facing the felling direction (E). Be sure you don t
make the lower cut too deep into the trunk.
The notch (C) should be deep enough to create a hinge
(F) of sufficient width and strength. The notch should be
wide enough to direct the fall of the tree for as long as
possible.
Never walk in front of
a tree that has been
notched.
WARNING:
Never saw completely through the trunk. Always leave a
hinge. The hinge guides the tree. If the trunk is completely
cut through, control over the felling direction is lost.
Insert a wedge or felling lever in the cut well before the
tree becomes unstable and starts to move. This will
prevent the guidebar from binding in the felling cut if you
have misjudged the falling direction. Make sure no
bystanders have entered the range of the falling tree
before you push it over.
Before making the
final cut, always recheck
the area for bystanders, animals or obstacles.
WARNING:
Make the felling cut (D) from the other side of the tree
and 1.5 - 2.0 inches (3-5 cm) above the edge of the
notch (C) (Fig. 9).
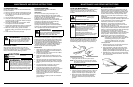
G
H
Fig. 10
Felling Cut:
1. Use wooden or plastic wedges (G) to prevent binding
the bar or chain (H) in the cut. Wedges also control
felling (Fig. 10).
2. When diameter of wood being cut is greater than the
bar length, make 2 cuts as shown (Fig. 11).
As the felling cut
gets close to the
hinge, the tree should begin to fall. When
tree begins to fall, remove saw from cut,
stop motor
, put chain saw down, and leave
ar
ea along r
etr
eat path (Fig. 8).
WARNING:
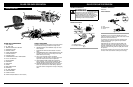
STARTING/STOPPING INSTRUCTIONS
Never operate the saw
without the bar and
chain properly installed.
WARNING:
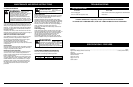
1. Fill the oil tank with correct chain and bar oil (Fig. 3).
Use a funnel, wipe up any spills and make sure no dirt
gets into the tank.
NOTE: The saw chain requires lubrication when in use to
minimize friction with the guide bar. The oil tank
holds 4.5 ozs of oil, enough to lubricate the chain
for 12-15 minutes of sawing. We recommend
using original equipment manufacturer Bar and
Sprocket Oil, which contains additives to reduce
friction wear and reduce resin residue formations.
NOTE: Your chain saw is equipped with an Automatic
Oiler system and is the ONLY source of
lubrication for the bar and chain.
2. Be certain the Chain Brake® is disengaged before
starting unit (Fig. 4). Disengage it by pulling backward
toward the motor.
3. Hook the extension cord to the extension cord retainer
(A) (Fig. 5) that is built into the rear handle. This will
prevent the cord from pulling out of the handle. Double
the extension cord, about a foot from the end, and
insert it through the hole at the end of the handle.
Hook the loop formed by doubling the cord over the
tab. Gently tug on the cord to ensure that it is firmly
retained in the saws handle. Plug the receptacle end of
the extension cord into the tool’s power supply cord.
4. Grip the saw with both hands, left hand holding the
front /handle (DO NOT HOLD CHAIN BRAKE®) and
the right hand holding the rear handle. Thumbs and
fingers should encircle both handles (Fig. 6).
5.
With your right thumb, depress the LOCK/OFF button
(C) on the top of the rear handle, and at the same
time squeeze the trigger. To stop the saw, release the
trigger (Fig. 7).
NOTE: It is not necessary to maintain pressure on the
LOCK/OFF button once the trigger is squeezed
and the motor is running. The LOCK/OFF button
is a safety device to avoid accidental starting.
STOPPING INSTRUCTIONS
The saw motor will automatically stop when the trigger is
released. To restart the motor, you will have to depress
the LOCK/OFF button and squeeze the trigger.
STARTING INSTRUCTIONS
The oil tank level
should be frequently
checked during operation to avoid starving
the bar and chain of lubrication.
CAUTION:
Ensure the extension
cord is of the proper
size and type for your saw.
WARNING:
Make sure the
extension cord does
not come in contact with the guide bar and
saw chain.
WARNING:
Oil Cap
Oil Tank
Inspection Spot
A
C
Fig. 3
Fig. 5
Fig. 4
Fig. 6
Fig. 7
A