


10 Section 3— ASSembly & Set-Up
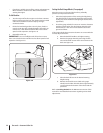
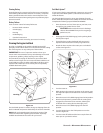
Attaching The Seat
If the seat for your tractor was not attached at the factory, follow
the applicable instructions below to attach it.
NOTE: For shipping reasons, some seats are not attached at the
factory. In this is the case, free the seat from its shipping position:
1. Remove the hex screw (or knob screw if applicable) from
the bottom of seat. See (a) in Figure 3-5.
2. Position the seat facing forward over the seat pivot bracket,
with the two forward seat mount tabs fitting into the
provided grooves in the seat pivot bracket. See (b) in Figure
3-5.
3. Slide the seat rearward and align the center mounting
hole in the seat with the slot in the seat pan. Insert the hex
screw (or knob screw if applicable) previously removed. Do
not tighten at this point.
4. Adjust the seat to the optimal operator preferred location,
this may mean actually sitting in the seat to decide what
feels best to the operator. Keep in mind the operator needs
to be able to fully operate all pedals comfortably while
sitting back in the seat.
5. Tighten the hex screw (or knob screw if applicable) at this
time.
b
a
Figure 3-5
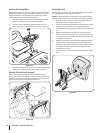
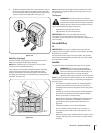
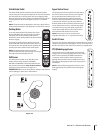
Attaching The Steering Wheel
If the steering wheel for your tractor did not come attached, the
hardware for attaching it has been packed within the steering
wheel, beneath the steering wheel cap. Carefully pry off the
steering wheel cap and remove the hardware.
1. With the wheels of the tractor pointing straight forward,
place the steering wheel over the steering shaft.
2. Place the washer (with the cupped side down) over the
steering wheel and secure with the hex bolt. See Figure 3-3.
Figure 3-3
3. Place the steering wheel cap over the center of the steering
wheel and push downward until it “clicks” into place.
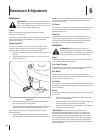
Attaching The Dash Collar (If equipped)
If the tractor’s dash collar did not come attached from the
factory, the screws for attaching it can be found in either side of
the dash console. Remove the two screws from the console and
secure the dash collar as illustrated in Figure 3-4.
Figure 3-4