


13
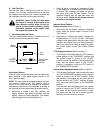
K. Fuel Tank Cap
The fuel tank cap is located at the rear of the LH
console. Turn the cap counterclockwise to unscrew
and remove from the fuel tank. Always re-install the
fuel cap tightly onto the fuel tank after removing.
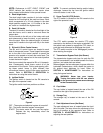
WARNING: Never fill the fuel tank when
the engine is running. If the engine is hot
from recently running, allow to cool for
several minutes before refueling. Highly
flammable gasoline could splash onto
the engine and cause a fire.
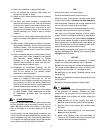
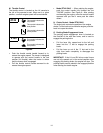
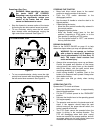
L. Hour Meter/Indicator Panel
The hour meter/indicator panel is located on the LH
console to the left of the operator’s seat.
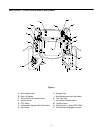
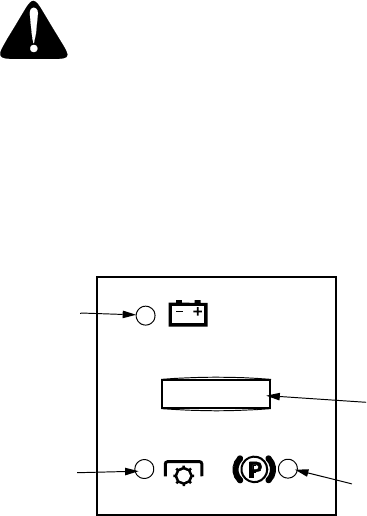
Figure 7
Hour Meter Feature
The hour meter records the hours that the tractor has
been operated in the digital display (tenths of an
hour-right most digit).
NOTE: The hour meter is activated whenever the igni-
tion switch is turned to the "ON" position. Keep a
record of the actual hours of operation to assure all
maintenance procedures are completed according to
the instructions in this manual and the engine manual.
• When key is turned to the "ON" position, the
battery indicator light briefly illuminates and the
battery voltage is briefly displayed. The display
then changes to the accumulated hours.
• Every 50 hours a "change oil" message will flash
on the display for 2 minutes every time the tractor
is started. This message will repeat for the first
two hours after each 50 hour interval. The oil
pressure indicator light will also flash when this
display is active. Follow the oil change intervals
provided in the engine manual.
Indicator Panel Feature
Battery Indicator (Refer to Figure 7)
• Illuminates and the battery voltage is displayed
briefly when the ignition switch it turned to the
"ON" position.
• Illuminates to indicate the battery voltage has
dropped below 11.5 (+0.5/-1.0) volts. The battery
voltage is also displayed on the hour meter. If this
indicator and display come on during operation,
check the battery and charging system for possi-
ble causes and/or contact your White Outdoor
dealer.
PTO Engaged Indicator (Refer to Figure 7)
• This indicator illuminates when the PTO switch is
pulled upward in the "ENGAGED" position and
the ignition switch is turned to the "START"
position. Check this indicator if the engine will not
crank with the ignition switch in the "START"
position. If necessary, move the PTO switch to
the "DISENGAGED" position.
Parking Brake Engaged Indicator (Refer to Figure 7)
• This indicator illuminates when the parking brake
is in the DISENGAGED position and the ignition
switch is turned to the "START" position. Check
this indicator if the engine will not crank with the
ignition switch in the "START" position. If neces-
sary, move the parking brake to the ENGAGED
position.
This indicator also illuminates when the ignition
switch is turned to the "START" position and the
RH and/or LH drive control levers are in a posi-
tion other than the fully out in neutral position.
Move the control levers fully outward.
Battery
PTO
Parking Brake
Engaged
Engaged
Indicator
Hour
Meter
Indicator
Indicator