


10
WARNING: Always stop engine and
disconnect spark plug wire before
cleaning, lubricating or doing any kind of
maintenance on your machine.
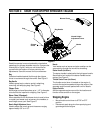
Lubrication
Wheels: Lubricate each wheel shoulder screw once a
season with light oil. Refer to Figure 5.
Nozzle height adjustment levers: Lubricate the pivot
points of the nozzle height adjustment levers once a
season with light oil. Refer to Figure 5.
Engine: Follow the separate engine manual packed
with you unit for lubrication instructions.
Maintenance
Engine
Refer to the separate engine manual for all engine
maintenance instructions.
• Check engine oil level before each use as
instructed in the separate engine manual packed
with your unit. Read and follow instructions
carefully.
• Clean air cleaner every 25 hours under normal
conditions or once a season. Clean every few hours
under extremely dusty conditions. To service the air
cleaner, refer to the separate engine manual
packed with your unit.
• The spark plug should be cleaned and the gap
reset once a season. Check engine manual for
correct plug type and gap specifications.
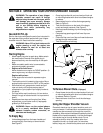
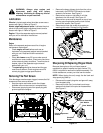
Removing The Flail Screen
If the discharge area becomes clogged, remove the flail
screen and clean area as follows:
• Stop the engine and make certain the chipper
shredder vacuum has come to a complete stop.
• Disconnect spark plug wire from spark plug and
ground against the engine.
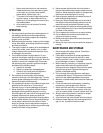
Figure 9
• Remove the bag or blower chute from the unit as
instructed in the OPERATION section to obtain
access to flail screen. See Figure 9.
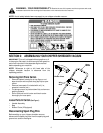
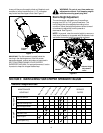
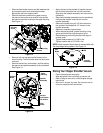
• Remove hex screw on right side of unit that
attaches to the fail screen. See Figure 10.
• Remove hex screw and flat washer on top of rear
housing mounting bracket and the lock nut that
secures flail screen. See Figure 9.
• Remove and clean the screen by scraping or
washing with water. Reinstall the flail screen.
Figure 10
Sharpening Or Replacing Chipper Blade
Because the engine on this unit has a tapered
crankshaft, a special impeller tool (part number 753-
0900) is required to remove the impeller assembly. For
further assistance, contact your local service dealer.
NOTE: When tipping the unit, empty the fuel tank and
keep spark plug side up.
• Disconnect the spark plug wire and ground it away
from the spark plug.
• Remove the lock nuts, front wheels, and wave
washers that attach to the pivot arm assemblies.
See Figure 11.
Figure 11
Hex Screw & Flat Washer
Flail Screen
Lock Nut
Remove
Hex Screw
Wave Washer
Bell Washer
Pivot Arm Assembly
Lock Nut
Shoulder
Screw
Height Adjustment
Bracket