


WR-300/301 Owner’s Manual
Page 2 www.midlandradio.com
Quick Start Instructions:
Quick Start Instructions:
1. Place 4 AA batteries (not supplied) into the compartment on the underside of the radio.
(Note:batteries are important because they provide emergency power for the radio in case
of a power outage.)
2. Plug the AC adapter into a standard house outlet. Plug the other end of the adapter into the
DC jack on the back of the radio.
3. Pull out the antenna and extend to its full length above the weather radio
4. Program the Weather Channel for Your Area-
(A). Turn the radio on with power/volume wheel on side of the radio (Ensure the volume is
up so you will be able to hear the broadcast).
(B). Press the “MENU” button.
(C). Press the “UP” (or “DOWN”) arrow until “WEATHER CHANNEL” is displayed on the
LCD.
(D). Press the “SELECT” button.
(E). Press the “UP” arrow to manually scroll through the weather channels
until you hear the weather broadcast.
(F). Press the “SELECT” button to save this channel.
(G). Press the “MENU” button to exit programming mode.
5. Press the “WEATHER/HAZARD ON/OFF” button to listen to the weather radio. Then use
the power/volume wheel to adjust the volume to a desired listening level.
You are now able to receive weather alerts for your area and surrounding areas. To narrow the
alerts to just your county, see pg. 8 to program the S.A.M.E. code for your county into the radio.
To get the S.A.M.E. code for your area, call
To get the S.A.M.E. code for your area, call
1-888-697-7263 or visit
1-888-697-7263 or visit
www. nws.noaa.gov/nwr/indexnw.htm
www. nws.noaa.gov/nwr/indexnw.htm
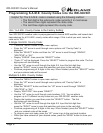
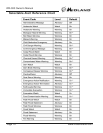
Weather Channel Frequencies:
Weather Channel Frequencies:
Channels Preset on the
Weather Radio
Broadcast Frequency
(MHz)
1
162.400
2
162.425
3
162.450
4
162.475
5
162.500
6
162.525
7
162.550
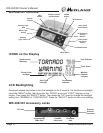
Please see pg. 5 for important buttons and controls.