


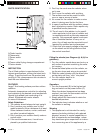

PARTS IDENTIFICATION
A.Plastic handle
B.Thermostat
C.Power switch
D.Fins
E.Power cable & plug storage compartment
F.Castor wheels
INSTRUCTION
The oil filled radiator is manufactured to the
highest specifications, utilizing the latest tech-
nology. To get the best from this product and
prolong it’s life, please spare a few minutes to
read the user instructions.
FEATURES
Large 7-fins heating surface provides uniform
radiation.
Automatic temperature controller for adjusting
and maintaining the desired room temperature.
Special high-speed heat conducting oil is
utilized. Equipped with castor wheels
for ease of movement.
Safety Guidelines
1. The radiator should always be kept upright
2. Don’t position your radiator near to flam-
mable materials. Allow a distance of at least
50mm between furniture, curtain, walls and
any other household objects.
3. Don’t position your radiator directly under a
socket outlet.
4. If the cord becomes worn, it must be re-
placed by a qualified technician.
5. Don’t lay the cords over the radiator when
not in use.
6. Don’t cover the radiator with anything.
7. The radiator must not be used in a bath-
room or near a source of water.
8. It’s normal for the radiator to make a noise
when it is being used for the first time.
9. In case of problems with the radiator, please
don’t attempt any repairs. Refer repairs only
to qualified service personnel.
10. The oil used in this radiator is of a specifi-
cation particular to this type of radiator and
is manufactured with a precisely measured
quantity. Only approved agents must open
the oil container section to carry our re-
pairs. Any oil leak must be reported to and
repaired by qualified service personnel.
11. Check that your supply voltage is the same
as the shown on the rating label and that
the socket is earthed.
Fitting the wheels (see Diagram (a) & (b) for
guidance)
1. Turn the radiator upside down and rest on a
soft surface to prevent scratching the radia-
tor housing.
2. Screw the wheel plate onto the radiator, us-
ing the wire loops and wing nuts provided.
3. Push the castor wheels onto the wheel pins
on the plate until they “click” into place.
4. Turn the radiator back to its
correct upright position.
Operation:
1. Turn the thermostat (B) to the highest set-
ting and switch on the power button (C).
When the desired temperature has been
reached, turn back the thermostat until the
indicator lamp goes out.
2. Simply adjust the thermostat to retain the
desired temperature.
3. The indicator lamp indicates whether or not
the radiator is working.
Warning
1. This appliance is not intended for use by
persons (including children) with reduced
physical, sensory or mental capabilities or
lack of experience and knowledge, unless
they have been given supervision or instruc-
tion concerning use of the appliance by a
A
C
E
B
D
F
_IM.indd 2 12/3/2013 11:58:36 AM