


10
11
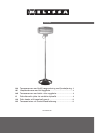
INTRODUCTION
To get the best out of your new apparatus, please read this user guide carefully
beforeusingitforthersttime.Takeparticularnoteofthesafetyprecautions.We
also recommend that you keep the instructions for future reference.
IMPORTANT SAFETY PRECAUTIONS
• Connect to 230 V, 50 Hz only. The guarantee is not valid if it is connected to the
wrong voltage.
• The apparatus may only be used for its original purpose. Do not use for drying
towels, clothes, etc. Not for commercial use not for heating building sites,
greenhouses, barns, etc.
• Handle with care. The quartz tubes in the heating head are fragile. Avoid
subjecting to heavy impact. Do not remove the grille. If necessary to clean the
heating head inside, contact a professional.
• The appliance should be set up or mounted in accordance with the instructions
in section “Positioning of the appliance” below.
• The appliance is high powered and can emit very intense heat. Do not expose
animals or small children to direct heat from the appliance.
• Theappliancemustneverbemountedorusedinthevicinityofammable
objects, e.g. curtains, furniture, etc. It must not be set up or mounted close to
wall sockets or in wet or damp environments (in bathrooms, by swimming pools,
etc.).
• Do not use the appliance outdoors in wet weather!
• Inordertoreducetheriskofreorelectricshock,neverusetheappliance
together with an electronic timer or device which turns on and off the appliance
automatically.
• Do not cover.
• Do not cover or block the remote control receiver. This will prevent the signal
being received.
• Ensure that the cable does not get caught beneath the appliance, behind
shelves etc. Do not run the cable under carpets etc. Place the cable so that it is
not possible to trip over it, and avoid wrapping it around the stand (only models
with base) or heater head.
• If use of an extension cable is required with the appliance, then the extension
cable should have a minimum rating of 10A and 2000W. If a cable reel is used,
then it should be unrolled entirely.
• Do not submerge in any form of liquid.
• Neverinsertyourngers,pencilsorotherobjectsthroughthegrille.Thegrille
will become hot during use and must not be touched until the appliance has
cooled down.
• Keep an eye on any children in the vicinity of the apparatus when it is in use.
Children must not be allowed to use the apparatus unless supervised by an
adult.
• Switch off before moving or cleaning the appliance.
• Never try to repair the apparatus yourself. If the apparatus, cable or plug needs
to be repaired, it should be taken to an authorised service centre. Unauthorised
repairsormodicationstotheappliancewillinvalidatetheguarantee.Please
contact the store where you bought the appliance for repairs under guarantee.
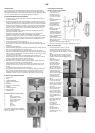
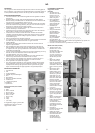
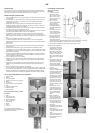
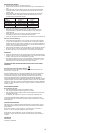
KEY TO MAIN COMPONENTS OF THE APPARATUS
1. Heating head
2. Grille
3. Function indicator
4. Receiver for remote control signal
5. String
6. Power cord
7. Stand (only for model with base)
8. Clip
9. Wall mounting bracket
10. Mounting screw
11. Remote control
Stand components (only for models
with base)
a. Base
b. Stand, lower part
c. Washer and screw
d. Stand, middle part
e. Stand, upper part
f. Screws (x2)
g. Sleeve
h. Collar
i. Thin rod
A mounting wall bracket together
rawlplugs and screws are included with
the wall-mounted model.
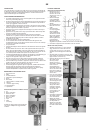
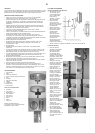
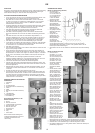
POSITIONING THE APPLIANCE
Wall-mounted model
(670-202)
• The heater head (1)
should be at least
30cm from the ceiling,
50cm from any side
wall, and at least 1.8m
abovetheoor.
• Mount using the
included wall bracket,
do not use other
bracketsorttings.
• The angled section of
the bracket should face
upwards.
• Hang the heater head
on the wall bracket.
The mounting bracket
on the upper part of
the rear of the heater
head should hang in
the angled part of the
wall bracket, and the
mounting screws (7) should be placed in the holes at the bottom of the wall
bracketandpresseddown,untiltheheaterheadisrmlyxed.
• Checkthattheapplianceisrmlyxedinplacebeforeusingit.
Model with stand (670-203)
• The appliance should be
sited at least 1m from the
nearest wall. The heater
head should be at least
30cm from the ceiling, and
at least 1.8m above the
oor.Theapplianceshould
standrmlyonahorizontal
oor.
• Put the lower part of the
stand (b) in the base (a),
lay the base on its side,
and fasten the stand
to the underside of the
base with the washer and
screw (c).
• Position the base
correctly so that the stand
is upright. Slacken screw
(f) in the middle of the
stand (d), and insert the
middle part into the lower
part. Align the crew with
the recess in the lower
part. Tighten the screw.
Inthesameway,xthe
upper part of the stand
(e) in the middle part with
a screw.
• Insert the thin rod (h)
in the sleeve (g) on the
upper end of the stand.
Pass the collar (h) down
over the thin rod and
screwrmlyontothe
sleeve.
• Mount the heating
head on the thing rod
so that the hole in the
rod is aligned with the
hole in the head. Secure
using mounting screw
(10). Tighten all screws
thoroughly.
• Check that the appliance
isstandingrmlyinplace
before using it.
• The cable may be secured
in the cable holder on the
stand.
• The curved stand can be
rotated 360° so that the
heating head can face in
any direction.
UK