


8
Looking a
t or near the
Sun will cause irreversable dama
ge to your eye.
Do not point
this telescope at or near the Sun. Do not look through the telescope as it is moving.
COLLIMATION OF THE OPTICAL SYSTEM
Precise collimation, or alignment, of your telescope’
s optical system is essential for
good performance. All Meade telescopes are accurately collimated at the factory prior
to shipment.
You may want to collimate after the telescope has been shipped or if it
has endured rough handling or a bumpy car journey—usually, though, just a small
touch up is all that's required.
Meade of
fers an optional laser collimator to help you to collimate your telescope (see
O
PTIONAL ACCESSORIES, page 18). Nevertheless, take the time now to familiarize your-
self with the following collimation procedure so that you may recognize a properly
collimated instrument and adjust the collimation yourself, if necessary.
Correct Collimation
The collimation procedure for the Meade LightBridge Dobsonian is slightly different
from that of other Newtonian reflecting telescopes, because of the "fast" f/5 to f/6 focal
ratio of the primary mirror. In typical Newtonian reflectors with more conventional focal
ratios (i.e. longer focal ratios), when the observer looks down the focuser tube (with-
out an eyepiece in the focuser), the images of the diagonal mirror, primary mirror,
focuser tube and the observer's eye appear centered relative to each other.
However, with the short focal ratio primary mirror of the LightBridge Dobsonian, cor-
rect collimation requires that the diagonal mirror be offset in 2 directions: (1) away
from the focuser and (2) towards the primary mirror, in equal amounts. This offset is
approximately 1/8" in each direction. Note that these offsets have been performed at
the factory prior to shipment of your telescope. It is only necessary for you to confirm
that the telescope has not been badly jarred out of collimation, and to perform the final
fine-tuning of Step 4, below.
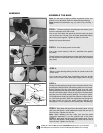
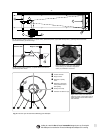
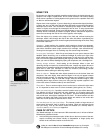
Fig. D shows a correctly collimated LightBridge Dobsonian telescope, as it appears
when viewed through the focuser with the eyepiece removed.
To check and, if necessary, set the optical collimation, follow these steps:
1. Observe through the focuser and orient your body so that the telescope's primary
mirror is to your right, and the open end of the telescope tube is to your left.
The diagonal mirror will appear centered as shown (
2, Fig. D). If the diagonal
appears off center, then adjust the 3 collimation screws (
2, Fig. B) on the plastic diag-
onal mirror housing.
2. If the reflection of the primary mirror (
3, Fig. D) is not centered on the surface of
the diagonal mirror, adjust the 3 collimation adjustment screws on the diagonal mirror
housing to center the reflection.
As described above, the 3 collimation screws on the diagonal mirror housing are used
for two different adjustments during the collimation procedure.
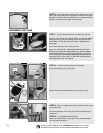
Important Note: Do not force the 3 screws past their normal travel, and do not rotate
any screw or screws more than 2 full turns in a counterclockwise direction (i.e., not
more than 2 full turns in their "loosening" direction), or else the diagonal mirror may
become loosened from its support. Note that the diagonal mirror collimation adjust-
ments are very sensitive: generally turning a collimation screw 1/2-turn will have a
dramatic effect on collimation.
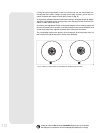
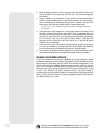
3. If the reflection of the diagonal mirror is not centered within the reflection of the pri-
mary mirror
, adjust the 3 collimation adjustment screws (
20, Fig. C) located on the
rear of the primary mirror cell.
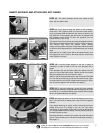
Proceed by "trial and error" until you develop a feel for which collimation screw to turn
in order to change the image in any given way.
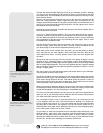
4. Perform an actual star test to confirm the accuracy of steps 1 through 3. Using the
26mm eyepiece, point the telescope at a moderately bright (second or third magni-
tude) star, and center the image in the main telescope's field of view.
Note: A small paper ring is
attached to the primary
mirror. This ring was
attached at the factory for
purposes of laser collima-
tion. The ring will not dimin-
ish your telescope's imag-
ing capabilities and does
not need to be removed.