


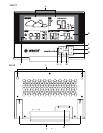


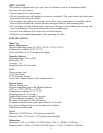

A. WEATHER/ OUTDOOR TEMPERATURE window
B. INDOOR TEMPERATURE/ HUMIDITY window
C. CLOCK window
D. DOWN (? ) button
• Select the next available mode
• Press and hold for 2 seconds to search for wireless signal from remote sensor.
• Decrease parameters.
G. ALARM button
• When time mode has been selected, press once to display the alarm time of
weekday alarm (W), single alarm (S) and pre-alarm (Pre-AL).
• Hold for 2 seconds, set weekday, single or pre-alarm’s alarm time.
• When indoor temperature and humidity mode has been selected, press once to display the
highest or lowest temperature alarm’s value.
• Hold for 2 seconds, set the highest or lowest temperature alarm’s value.
• When alarm is on, press once to stop the alarm temporarily.
I. CHANNEL button
• Press to display the outdoor temperature readings of Channels 1, 2 and 3. (additional remote
sensors are required)
• Hold for 2 seconds, enter into the circulation mode and outdoor temperature readings of
Channels 1, 2 and 3 will be displayed automatically in every 5 seconds.
F. MODE button
• When time mode has been selected, press once to toggle between time with seconds display
or time with weekday display.
• Press and hold for 2 seconds, set language of the day of the week, year digit, month digit,
date digit, hour format (12/ 24 hours), hour digit and minute digit. (Note: calendar format is
default in month-date display)
• When indoor temperature and humidity mode has been selected, press and hold for 2 seconds
to toggle the temperature unit between Celsius or Fahrenheit.
E. UP (? ) button
• Press to select the next available mode
• Increase the parameters
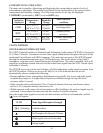
• In time with seconds display mode, press and hold for 2 seconds to activate/ deactivate atomic
time signal search manually.
• In time with weekday display mode, press and hold for 2 seconds to switch time zone from
Pacific, Mountain, Central to Eastern.
H. MEM button
• When indoor temperature and humidity mode has been selected, press to recall the minimum
or maximum temperature and humidity readings of main and remote units.
• Press and hold for 2 seconds, collected memories will be cleared.
J. WALL- MOUNT holes
• Use 2 provided screws to mount the unit on a wall
K. BATTERY COMPARTMENT
• Accommodate two (2) CR2032 batteries
L. TABLE STAND
7