


24
Looking at or near the Sun will cause irreversible damage to your eye. Do not point this telescope at or near the
Sun. Do not look through the telescope as it is moving.
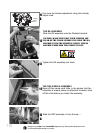
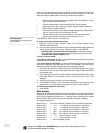
To Attach the handbox holder:
Remove the handbox holder from the plastic bag. If necessary, loosen the lock
knob (
1, Fig. 39a) and place the clamp (2, Fig. 39a) about one of the telescope's
handles. Tighten the lock knob to a firm feel. Slide the AutoStar II handbox into
the holder (
3, Fig. 39a).You may also snap the handbox into the holder: Slide one
side of the handbo
x into the holder and then firmly press the other side of the
handbox into the holder until it snaps in place. Adjust the tilt of of the holder by
loosening the lock knob and then moving the holder clamp to the desired angle.
Retighten the lock knob.
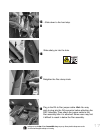
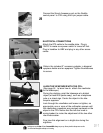
To attach the visual back and diagonal mirror:
Attach Visual back and Diagonal mirror: Thread the ring of the 2" accessory
adapter over the rear cell and rotate the ring, tightening to a firm feel. Slide the
diagonal into the 2" accessory adapter and secure it in place using the visual
back thumbscrew.
To
Insert eyepiece:
Remove the UltraWide 24mm eyepiece from its container and slide it in the
diagonal mirror. Tighten the thumbscrew located on the diagonal mirror to a firm
feel only.
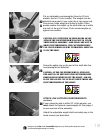
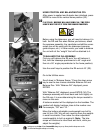
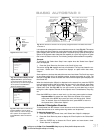
Mounting and Focusing the Viewfinder for the First Time
The first time you mount and focus the viewfinder, follow the these steps:
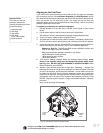
1. Attach the viewfinder mounting bracket assembly: The mounting bracket assem-
bly is shipped attached to the viewfinder bracket. Loosen the thumbscrews (
5,
Fig. 40a
) and slide the bracket out of the mounting assembly (the photo depicts
one thumbscrew removed for the sake of clarity).
2. Place the bracket assembly over the pre-drilled holes on th back outer rim of the
telescope, Thread and tighten the two supplied locking screws (
4, Fig. 40a).
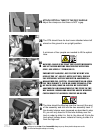
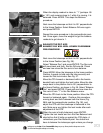
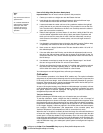
3. Attach the viewfinder bracket: Slide the track on the bottom of the viewfinder
bracket into the slot in the viewfinder mounting assembly. See
Fig. 40b.To secure
the viewfinder to the mounting assembly, tighten the two thumbscrews to a firm
feel only.
4. Slide the viewfinder tube (see
Fig. 40c) into the viewfinder bracket. Loosely tight-
en the adjustment screws (
12, Fig. 40d). You will use the adjustment screws to
align the vie
wfinder (see page 21).
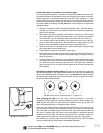
5.
Look through the vie
wfinder
.
Rotate the eyepiece/focuser until you sharply focus
the crosshairs. Rotate the tube so that the crosshairs align with the Dec and RA
ax
es
.
6. Loosen (rotate clockwise) the objective lens locking ring (
11, Fig. 40c).
7. Rotate the objective lens (
9, Fig. 40c) until you sharply focus on an object
located at infinity.
8. Tighten the locking ring (
11, Fig. 40c).
9.
Y
ou ma
y no
w rotate the e
y
epiece (
10, Fig.
40b
) to f
ocus on objects
.
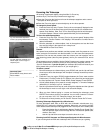
Align the Viewfinder
During the daytime, point the telescope at a distant object (at least 200 yards away),
such as a telephone pole or a street sign. Center the object in the telescope's eye-
piece.
Look through the viewfinder and loosen or tighten, as appropriate, one or more of
the collimation scre
ws
(
12, Fig.
40d
)
until the vie
wfinders crosshairs are precisely
centered on the object in the O
TA. Notice that the left rear collimation screw is
spr
ing-loaded (
12, Fig.
40d)—
y
ou don't need to adjust it—to make the adjustment of
the tw
o other rear knobs easier
.
Fine tune this alignment on a bright star during the nighttime.
GETTING STARTED
Fig. 39a: Handbox holder: (1) Lock
knob; (2) Clamp; (3)
b
c
d
Fig. 40b: Viewfinder bracket assem-
b
ly:
Slide the tr
ack (7) into the mount-
ing slot (6).Tighten the thumbscrews
(8) to secure.
Fig. 40c: 8x50 Viewfinder tube:
Objective lens (7), e
y
epiece/f
ocuser
(8) and locking ring (9).
Fig. 40a: Viewfinder mounting brack-
et
assembly : Mounting screws (4),
locking screws (5). Remove back
locking screw so you can thread in
g
e
h
f
i
j
1)
1!