


- 17 -
options, which are; ALTAZ, POLAR, and LAND.
Assuming that you have already entered correct local
time, latitude, and longitude (see
QUICK START
, page 9)
you are ready to choose a particular type of alignment, by
pressing the NEXT or PREV key to run the arrow beside
the desired option of ALTAZ, POLAR, or LAND, and then
pressing the ENTER key. The display will then give you
specific instructions from this point that will literally walk
you through the chosen alignment type.
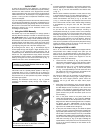
a. ALTAZ: ALTAZ (Altazimuth) requires that you mount
the LX200 directly to the top of the field tripod (with
the power panel facing North), and adjust the leg
extensions of the tripod until the instrument is level.
You are then required to align on one or two of the
bright stars in its look up table of 33 alignment stars.
This allows your LX200 to track in altitude and
azimuth simultaneously for visual observations, or
very brief (under five minutes) exposure
astrophotography or CCD imaging (longer exposures
will require the Field De-Rotator). ALTAZ allows you
to fully access the Object Library as well as all other
telescope functions. Complete instructions for using
ALTAZ are in the
QUICK START
(page 9).
b. POLAR: POLAR allows you to use the 16” LX200
(mounted on a permanent pier set to your latitude) as
an equatorial telescope. With the LX200 powered up,
the POLAR file option selected, and the field tripod
leveled, the telescope should be adjusted so that the
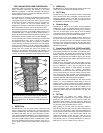
Declination setting circle (3, Fig. 1) is set to 90
degrees and the telescope is rotated to the 00 hour
angle (HA) position in Right Ascension. In this
position, the viewfinder (Fig. 1) is up-side down, and
the R.A. pointer (4, Fig. 5), the 00 line of the R.A.
setting circle (3, Fig. 5), and the HA pointer (5, Fig. 5)
all line up. (If you do not start at the 00 H.A. position,
the telescope will point to the ground instead of the
sky, when the keypad display chooses its second
star.) Press the ENTER key and the LX200 will
determine and slew to the precise off-set of the pole
star in Declination and Right Ascension.
At this point you need only aim the instrument at the
pole star (see
APPENDIX C
, page 31, if the pole star
is not visible) and center it in the eyepiece field using
only the altitude and azimuth adjustments on the
pier. Once done, you again press the ENTER key
and the LX200 will choose and slew to a very bright
star that is overhead and can usually be seen in the
field of view of the viewfinder. At this point, center the
bright star using only the Right Ascension and
Declination adjustments of the telescope (either
manually by loosening the locks only or electrically),
then press ENTER. You can now access every every
function of the LX200.
c. Refined Polar Alignment: Astrophotographers
routinely require polar alignments of the highest
accuracy for the finest guiding characteristics. Your
initial polar alignment can be refined by using the
LX200’s electronics by using a slightly different
method in the POLAR menu option. The steps
outlined below should be performed in two or three 15
minute intervals. At each interval the telescope will
slew to the area where the pole star should be
centered in the optics. You may find that the pole star
is somewhat off-center in the eyepiece showing the
alignment error that may have been made during your
initial setup. Re-center the pole star during each
interval using the tripod adjustments only (see
APPENDIX B
, page 29) in altitude and azimuth, then
follow the rest of the routine.
Return to the POLAR menu option in the
TELESCOPE mode and press the ENTER key.
Ignore the keypad display instructions to return the
telescope to 90 degrees in Declination and 00 HA.
Instead, press the GO TO key and the LX200 will
slew to the calculated position of where the pole star
should be.
Re-center the pole star in the field of view in the
eyepiece using only the adjustments on the pier in
altitude and azimuth.
Press the ENTER key, and the LX200 will once again
slew to a bright star overhead. Center this star using
the N, S, E, or W keys, then press ENTER.
NOTE: Pressing the MODE key at any point in the
alignment routine aborts the routine and exit to the top
menu.
After each 15 minute interval you will find that the
pole star becomes more accurately centered each
time. You can repeat the intervals as often as you like
to obtain the highest accuracy. An optional
illuminated reticle crosshair eyepiece makes the job
of centering the star easy.
There may be situations when it is impossible to see
the pole star due to something blocking your line of
sight. On such an occasion, just press the ENTER
key for the POLAR option so that it has a check next
to it, then follow the instructions in Precise Polar
Alignment, page 30. You will require the use of an
illuminated reticle crosshair eyepiece* to complete
the task. Once finished, follow the steps below for a
permanently mounted LX200 section to access the
Object Library.
d. The Permanently Mounted, Polar Aligned LX200:
For those who will permanently mount the LX200 in
an observatory, or wish to use the already polar
aligned telescope for several nights in succession, it
is recommended that a high precision polar
alignment be made with one of the methods
described above. Once done, however, you need not
bother yourself to go through a polar alignment
routine on successive nights (provided that you do
not move the instrument on the pier) to access the
Object Library and enjoy near perfect tracking.
To bypass the polar alignment sequence, follow the
steps outlined below:
• Return to the POLAR menu option and place a check
next to it by pressing the ENTER key.
• Then directly enter the catalog number of an object
that you are familiar with in the sky by pressing the
M, STAR, or CNGC key (see
APPENDIX D
, page 34,
for information on the Object Library) and press the
ENTER key again.
• Manually center the familiar object in the eyepiece of
the telescope.
• Press and hold the ENTER key until the display
reads
“
Coordinates matched.”
You have now synchronized the Object Library and
the LX200 will correctly access every other object in
the sky.
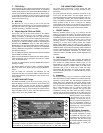
e. LAND: The LAND menu option transforms the
ALTAZ (Altazimuth) mounted LX200 into an electric
slewing spotting scope. In this mode, continuous
tracking is canceled and all of the celestial modes
and menus are non-functional, showing lower case
lettering in the displays and a beep tone if you try to
enter one of them.
The LX200 will slew at any one of the four speeds of
SLEW, FIND, CNTR, and GUIDE as activated by
pressing the appropriately marked keys on the left