


- 18 -
and horizontal locks. In this
orientation the telescope’s optical
tube is lined up parallel to the
tripod’s adjustable leg.
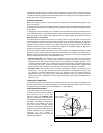
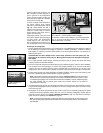
8. Note the line and arrow extending
from the telescope tube in Fig. 16.
This line defines the telescope’s
polar axis. Lift the entire telescope,
including tripod, and place the
telescope on a firm and level
surface so that this axis is pointing
due North (i.e., if the location of
Polaris, the North Star, is known,
then point the telescope directly at
Polaris).
9. If using the high-latitude tripod leg in
the Northern hemisphere, extend
the leg until the telescope’s polar
axis points to Polaris, or due North,
an alignment obtained by sighting
along the telescope tube with the telescope oriented as shown in Fig. 16.
Note: Observers located in the earth’s Southern Hemisphere must point the telescope’s polar
axis due South.
10.With the telescope now polar-aligned, the table tripod should not be moved, or else polar alignment will
be lost. Motions of the telescope (e.g., to locate and/or track objects) can be affected only by (a)
loosening the locks (6 and 9, Fig. 1), which permits the optical tube to be moved freely within the
telescope mounting, or (b) more generally, with the locks in their “locked” positions, by using the Arrow
keys of the Electronic Controller.
Note: For almost all astronomical observing requirements, approximate settings of the
telescope’s polar axis are acceptable. Do not allow undue attention to precise polar alignment of
the telescope to interfere with your enjoyment of the instrument. In those unusual cases where
more precise polar alignment is desirable, refer to
APPENDIX C
, page 28.
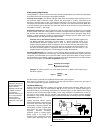
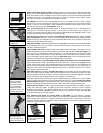
PHOTOGRAPHY
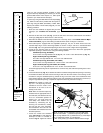
Photography through your ETX model requires the addition of the optional #64 T-Adapter (see OPTIONAL
ACCESSORIES
, page 20). With the #64 T-Adapter attached to the telescope (Fig. 18), through-the-telescope
photography is possible with any 35mm camera body with a removable lens. In this way the telescope
effectively becomes the lens of the camera.
For through-the-telescope photography, turn the flip-mirror control (5, Fig. 18) to the “down” position,
allowing light to pass straight through the telescope and out the photo port (15, Fig. 1). With the flip-mirror
control in the “down” position and the photo port’s dust cover removed, you can see the front lens of the
telescope when you look through the photo port. The #64 T-Adapter threads onto the photo port, followed
by a T-mount for the particular brand of 35mm camera being used, followed by the camera body (with the
camera lens removed).
The #64 T-Adapter consists of two sections (1 and 2, Fig. 18), which are threaded together in shipment.
You may use either of the following photographic mounting formats to couple the camera body to the
telescope’s photo port thread.
• Format 1: Camera Body + T-Mount + Section (1) of the #64 T-Adapter (7, Fig. 18).
ETX-90EC 1250mm at f/13.8
ETX-105EC 1640mm at f/15.6
ETX-125EC 1900mm at f/15
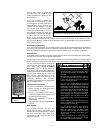
Format 1 utilizes only the short section of the #64 T-Adapter to permit close-coupling of a camera body to
the telescope. In this format vignetting will occur: the photographic image will appear on film with a slight
darkening at the corners of the 35mm frame (see Fig. 19).
• Format 2: Camera Body + T-Mount + Sections (1) and (2) of the #64 T-Adapter (see Fig. 18).
ETX-90EC 1450mm at f/16
ETX-105EC 1830mm at f/17.4
ETX-125EC 2310mm at f/18
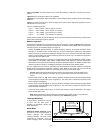
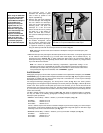
CAUTION!
When using the #880 Table
Tripod with the ETX-90EC,
the optional #1422 Low-
Latitude Balance Weight is
recommended if the
telescope is to be polar
aligned below 30°, or if
heavy accessories are
attached to the eyepiece-
end of the telescope. The
low-latitude balance
weight is recommended
for the ETX-105EC or ETX-
125EC at all observing
latitudes and is included
as standard equipment
with the #881 Table Tripod.
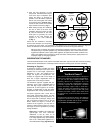
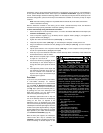
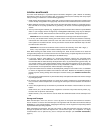
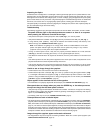
Fig. 17: Examples of Alt/Az and polar mounting of an
ETX-90EC to the optional #883 Deluxe Field Tripod.
ALT/AZ:
Tripod head
locked at 90°
POLAR:
Tripod head
locked at
observer’s
latitude