astro-tech
www.astronomytechnologies.com
from Astronomy Technologies, PO Box 720013, Norman, OK 73070
© 2008 by Astronomy Technologies Specifications, features, and descriptions are effective 4/1/2008, but are subject to correction and/or modification without notice and/or obligation.
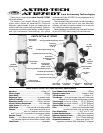
Eyepieces and Star Diagonals: Your Astro-Tech AT 127EDT
includes two 1.25” wide field eyepieces, a 2” enhanced reflectivity non-
marring compression ring star diagonal, and a 1.25” non-marring
compression ring eyepiece adapter so you can start observing
immediately. In addition, any brand or type of eyepiece can be used
with the scope, from a 50mm 2” for the lowest practical magnification
(19x) to a 3.5mm (271x) for very high power use.
The focal length of the AT127EDT is ideal for low to medium power
wide-angle views of nebulas, open star clusters, large galaxies, and
comets. Crisp views of the Moon and planets are also routine at
magnifications of 95x to 190x when seeing conditions permit.
To calculate the magnification of your telescope and eyepiece
combination, divide the telescope focal length in mm by the eyepiece
focal length in mm. For example, a 10mm eyepiece in the AT127EDT
will give you a magnification of 95x (950mm/10mm = 95).
Mounting the AT127EDT: A stable mount is essential for best
viewing. The scope is supplied with 130mm i. d. split rings and a de-
tachable Vixen-style dovetail bar. These will let you mount your
AT127EDT on a German equatorial mount (such as a Celestron Ad-
vanced Series or Meade LXD-75 go-to mount, or a Vixen Polaris or
Great Polaris equatorial or Sphinx go-to mount) for serious astronomi-
cal observing. The AT127EDT can also be used on a suitable sturdy
altazimuth mount.
Keep in mind that the AT127EDT with 2” diagonal and a 2” eyepiece
can weigh as much as 24 pounds, so pay particular attention to the
payload capacity of the mount you choose.
Astronomical Observing: The theoretical maximum usable power
available from this telescope is 271x, although this requires a 3.5mm
eyepiece that provides a very dim 0.47mm diameter exit pupil. Still
higher powers
are
within the scope’s capabilities, but require truly ex-
cellent seeing conditions and the patience to wait for those conditions
to make their brief and infrequent appearances.
A more practical maximum magnification for astronomical viewing
with the AT127EDT would be 238x, using a 4mm eyepiece. Keep in
mind that seeing conditions play an important role in how high a mag-
nification you can use on any given night. Only very good seeing condi-
tions (clear skies and calm air) will support viewing at 238x. Under less
than ideal conditions, lower powers in the 95x to 158x range provide
more consistently usable and pleasing images.
The widest possible field of view with a 1.25” eyepiece is about 2.2°,
which can be achieved with a 24x (40mm) Plössl eyepiece yielding a
5.33mm exit pupil. A 2” wide field eyepiece, such as the 40mm TMB
Paragon, will give a 2.9° field at the same 24x power.
The AT127EDT does an outstanding job as an astrograph for 35mm
and CCD imaging. A large chrome lock knob on underside of the fo-
cuser lets you lock the position of the extra-long 108mm travel rack
and pinion focuser drawtube at a sharp focus for photography.
The Finderscope: The AT127EDT comes with a straight-through
viewing 8 x 50mm illuminated crosshair finderscope. Unlike most finders,
that show images that are upside down and backwards, the AT127EDT
finder images are upright and right-reading (the star patterns in the
finder are oriented the same way you see them with your bare eye).
The finder has two ribbed rings just behind its lens shade. The black
ring in front focuses the finder on infinity to match your eyesight. The
silver ring locks the desired focus in place. The focuser is set at a
standard infinity focus at the factory. However, if the stars are not sharp
for your individual eyesight, loosen the silver lock ring and turn the
black focus ring back and forth until the stars appear sharp. Then turn
the silver ring until it snugs up against the black focus ring to lock in
the focus for your eyesight.
The finder has also has two ribbed rings on the eyepiece. The black
ring at the rear adjusts the sharpness of the finderscope crosshairs to
match your eyesight. The silver ring locks the desired crosshair focus in
place. The crosshairs are set for a standard focus at the factory. However,
if the crosshairs don’t look sharp to you, loosen the silver lock ring and
turn the black focus ring until the crosshairs are sharp for your particular
eyesight. Then turn the silver ring until it snugs up against the black
focus ring to lock in the focus for your eyesight.
Attach the finderscope bracket to the scope using the large chrome
knob on the top of the focuser body. There are three collimating screws
on the finderscope bracket to line up the finder crosshairs with the
center of the eyepiece field.
As supplied, the finderscope will be positioned on the left side of the
scope. If you’d prefer to have it on the right, reverse the finder in the
bracket by unthreading the illuminator from the eyepiece, loosen the
three collimating screws, slide the finder out of the bracket, turn it
180°, and slide it back into the bracket. Reinstall the illuminator and
tighten the collimating screws. Bolt the bracket into the same top hole
on the focuser and the finder will now be on the right.
The finderscope illuminator uses two LR41 button-type batteries,
available at most Wal-Mart, drug, and camera stores. You access the
battery compartment by firmly holding the smooth base of the illuminator
while you unthread the ribbed top portion counterclockwise. When
installing new batteries, be sure the + marking on the batteries are
facing up as you drop them in the battery compartment. Turn the
illuminator off when not using the finder to conserve battery life.
Caring for Your Scope Optics: Never store the telescope in a
damp or humid environment. Avoid leaving it in a hot environment
(exposed to direct sunlight on a window sill, in a car trunk, etc.) If you
must store it in high humidity conditions, put a few packets of desiccant
(silica gel or the equivalent, available from most camera stores) in with
the telescope to absorb excess moisture. If not properly stored in a
humid environment, the telescope may develop mildew which can
damage the optics.
If dew has formed on the scope after a night of observing, allow the
scope optics to air dry at room temperature before putting the lens
cover on the scope and storing it away.
If the lens becomes dusty, smeared, or shows fingerprints or any
other surface build-up, clean it as follows. First, gently blow away any
surface dust or particles with a clean air blower (a child’s ear syringe or
a photographer’s camel’s hair brush with attached blower bulb, for
example). Using canned or compressed air is not recommended, as the
propellant in the can may spit out and leave difficult-to-remove deposits
on the lens. Also, the expanding compressed air drops in temperature
as it leaves the can. The cold air coming out of the tiny tube that most
compressed air cans use to direct the air flow has been known to chill
a lens enough to spall pieces of glass off the lens if pointed too closely
at the same spot on the lens for too long.
Second, moisten a cloth with a few drops of a photographic-quality
optical cleaning solution designed for multicoated camera and binocular
lenses. A well-worn cotton handkerchief works well and Zeiss and Kodak
both make suitable fluids. Do not drip the cleaning fluid directly on the
lens. Use the barely damp (not wet) cloth to gently wipe the lens surface
clean. Turn the cloth frequently to always keep a clean portion of the
cloth in contact with the lens. Blot the lens dry with a dry portion of the
cleaning cloth or with a separate cloth. Start with a clean cloth each
time cleaning is needed.
Avoid overcleaning your optics. The multicoatings on the lens are
quite hard and durable. However, frequent overzealous cleaning can
scratch the coatings if all the dust particles (which are often tiny flecks
of windborne rock) are not removed before you start pushing a damp
cloth around the lens surface. A few specks of dust on the lens will not
be visible in your images, as they are not in the focal plane and don’t
block enough light to measure, let alone be seen. Clean your optics
only when absolutely necessary. If you take proper care of your scope,
cleaning should rarely be needed.
Caring for Your Scope Finish: The AT127EDT uses a durable
automotive-style baked paint finish with anodized components. The
surfaces can become smudged with fingerprints during use, but these
will not harm the finish. A soft cloth slightly dampened with plain water
(or a little moisture from your breath and a quick wipe with a clean
handkerchief) is generally enough to remove fingerprints. Avoid harsh
chemical cleaners or organic solvents like benzene, alcohol, etc., as
these may ruin the finish. They can certainly affect the optical coatings
if they accidentally drip or splash on the objective lens.
Never use the telescope in the rain or in conditions where it may get
wet. The telescope is not waterproof. If the telescope accidentally gets
caught in a shower, immediately wipe off all water using a clean and
dry soft cloth. If the telescope gets totally soaked in water, or submerged,
immediately contact your dealer for service instructions. Do not
disassemble or attempt to repair your telescope yourself, as this violates
the warranty terms under the limited product warranty, and negates
any guarantee.
Caution! Never directly view the Sun with your telescope!
Never aim your AT127EDT at the Sun without having a professionally-
manufactured solar filter mounted over the objective lens. Viewing the
Sun through the scope without the proper protection for even a moment
may result in permanent severe damage to your eyes, and can even
cause blindness. Contact your Astro-Tech dealer if you are interested in
purchasing a compatible professional solar filter.


