


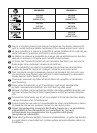

FAULT FINDING TABLE
Engine runs badly
Engine will not start
The machine runs
or looses power when cutting but does not cut well
Check STOP switch is in the position I.
•
Control fuel level min. 25% tank capacity.
••
Check air filter is clean.
••
Remove spark plug, dry it, clean it
and adjust it, and replace it, if necessary. ••
Control and adjust the carburetor screws if necessary.
•
Change fuel filter. Contact your dealer.
•
Carefully follow the cutting accessory assembly instructions.
•
Check chain is sharp. Otherwise, contact your dealer.
•
Engine still gives trouble: contact your dealer.
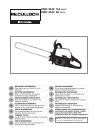
5
UK
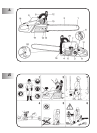
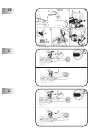
SAFETY CHAIN BRAKE
Your chain saw is fitted with a safety chainbrake desi-
gned to stop the chain in milliseconds in case of kick-
back. Always hold the saw firmly in both hands.
The chain brake does not provide a total protection if the
machine is used without taking the necessary precautions
and maintenances.
The chain brake is intended to engage automatically in case
of kickback.
The chain brake can also be engaged manually by pushing
the chain brake lever forwards.The manual use of the chain
brake is recommended only at idle.
Always test the chain brake before using your saw. Do this
by engaging the brake at idle (see below).
Always release the brake before starting.
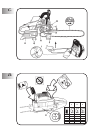
Kickback may occur if the end of the bar (see illustrated
angle) touches any solid object.
Never attempt to start a cut with the end of the bar.
Kickback is a violent upward and rearward movement of the
bar and may cause you to lose control of the machine.
Therefore you should avoid starting a cut with this part of the
bar. Always keep a firm grip on the saw with both hands
because, in case of kickback, it is the contact of the left hand
with the brake lever which will help to engage the brake.
CHAIN BRAKE TESTING:
1 The chain brake (A) is disengaged when brake lever is
pulled back and locked(chain can move).
2 The chain brake (A) is engaged when brake lever is in the
position (chain cannot rotate).The chain brake should snap
into both positions.If strong resistance is felt or lever does
not move into either position, DO NOT USE YOUR SAW.
Take it immediately to an authorized servicing dealer.
3 CHAIN CATCHER
This unit is fitted with a chain catcher below the drive
spocket. This is intended to stop the rearward movement of
the chain in case of breakage or if it should come out of the
bar. It should never be removed.
I
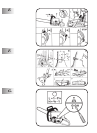
CHAIN SHARPENING
1 Chain cutter teeth can be sharpened with a round file,
as follows:
CHAIN FILE
SPR 378 GX 7/32”
The exact chain type is marked on the bottom half of the
drive link which runs inside the bar groove.
Filing can be made easier by also using a file holder.
The chain can remain fitted on the bar during sharpening.
Before commencing, the chain should be tensioned cor-
rectly and the chain brake should be activated to prevent
the chain from moving.
2 To obtain a correct sharpening the file must be carefully
held to maintain 3 basic angles:
– “A” Top angle 30° - 35°
– “B” External, side angle 85° - 90°
– “C” Internal, side angle 60°
File in one direction only, from the “inside” of the cutter
tooth towards the “outside”.
Do not allow the file to touch the chain as you bring it
back to re-position it. Each cutter tooth should be filed
with the same number of strokes.
3 The file should be held horizontally to the cutter tooth
being sharpened.
4 Best results to obtain a precise sideways angle can be
obtained by holding the file so that it rises 0,5 mm above
the top face of the cutter tooth.
5 DEPTH GAUGE
Correct depth gauge height is vital to ensure maximum
chain life and cutting efficiency.
The height of the depth gauge should be lowered as the
cutter tooth is filed back; this height should be checked
every 4 or 5 sharpenings.
The best way to do this is to use a flat file and a depth
gauge tool.
The correct setting is 0.65 mm below the top edge of the
cutter tooth.
The cutter tooth depth gauge should then be rounded (D).
L