


13 14
E
N
G
L
I
S
H
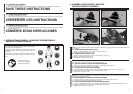
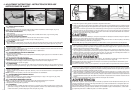
5-1. CONNECT THE CORD
1. Ensure the cord is NOT plugged into a receptacle before this procedure.
2. Make a loop with 8″ - 10″ (20 - 25cm) of the end of the extension cord.
3. Place the loop into the slots (A) under the rear handle and lock into place as shown in Figure 5-1.
4. Connect the extension cord to the trimmer.
5. Plug the extension cord into a receptacle ONLY when you are ready to operate the trimmer.
5-2. TRIMMER OPERATION
1. TRIMMING / MOWING (Fig. 5-2A). Swing trimmer with a sickle-like motion from side to side. Do not tilt the string-
head during the procedure. Test area to be trimmed for proper cutting height. Keep stringhead at same level for
even depth of cut.
2. CLOSER TRIMMING (Fig. 5-2B). Position trimmer straight ahead with a slight tilt so bottom of stringhead is
above ground level and string contact occurs at proper cutting point. Always cut away from operator. Do not pull
trimmer in toward operator.
F
R
A
N
C
A
I
S
5-1. BRANCHEMENT DU CORDON PROLONGATEUR
1. S'assurer que le cordon prolongateur n'est PAS branché dans une prise de courant avant de procéder à l'opéra-
tion suivante.
2. Former une boucle de 20 à 25 cm (8 à 10 pouces) avec l'extrémité du cordon prolongateur.
3. Placez la boucle dans les orifices (A) sous la poignée arrière et verrez-la en position ainsi qu'indiqué dans la Figure 5-1.
4. Brancher le cordon prolongateur sur le du coupe-herbe.
5. Ne brancher le cordon prolongateur dans une prise de courant secteur QUE lorsque l'on est prêt à utiliser l'ap-
pareil.
5-2. FONCTIONNEMENT DU COUPE-HERBE
1. COUPE ET TONTE (Fig. 5-2A). Utiliser un mouvement de balancement latéral semblable à celui d’une faux. Ne
pas incliner la tête pendant cette opération. Faire un essai sur la partie à tondre pour vérifier la hauteur de coupe.
Garder la téte de coupe à une hauteur constante pour obtenir une tonte uniforme.
2. POUR TONDRE DE PLUS PRÉS (Fig. 5-2B). Tenir le coupe-herbe droit devant soi et l’inclner légèrement de
manière que le fil de coupe se trouve à l’angle voulu sans que le dessous de la tête de coupe ne touche le sol.
Toujours tondre loin de soi, ne jamais amener le coupe-herbe à soi.
E
S
P
A
Ñ
O
L
4-1. CONECTE EL CABLE
1. Asegúrese de que el cable NO esté conectado en el receptáculo antes de este procedimiento.
2. Haga una lazada con 20-25cm (8-10″) del extremo del cable extensión.
3. Coloque el bucle dentro de las ranuras (A) situadas bajo el mango posterior y colóquelo en su sitio para bloquearlo,
tal y como muestra la figura 5-1.
4. Conecte el cable de extensión al de la recortadora.
5. Enchufe el cable de extensión en el receptáculo SOLO cuando esté preparado para hacer funcionar la recortadora.
5-2. OPERACIÓN DEL CORTADOR ORILLADOR
1. CORTADOR DE PASTO (Fig. 5-2A). Columpie la unidad de lado a lado. No incline el cabezal en este movimien-
to. Haga una prueba para definir la altura de corte. Mantenga el cabezal a una misma altura para un corte pare-
jo.
2. CORTE MAS CERCANO (Fig. 5-2B). Posicione el cabezal un poco inclinado , siempre corte alejado de personas
y del operador.
5 - OPERATING INSTRUCTIONS - INSTRUCTIONS D’UTILISATION
INSTRUCCIONES DE OPERACION
5-1
A
E
N
G
L
I
S
H
3. FENCE/FOUNDATION TRIMMING. Approach trimming around chain link fences, picket fences, rock walls and
foundations slowly to cut close without whipping string against the barrier. If the string comes in contact with rock,
brick walls, or foundations, it will break or fray. If string snags fencing, it will snap off.
4. TRIMMING AROUND TREES. Trim around tree trunks with a slow approach so string does not contact bark. Walk
around the tree trimming from left to right. Approach grass or weeds with the tip of the string and tilt stringhead
slightly forward.
5. SCALPING (Fig. 5-2C). Scalping refers to removal of all vegetation down to the ground. To do this, tilt the stringhead
to about a 30 degree angle to the left. By adjusting the handle you will have better control during this operation. Always
keep a distance of 100 feet (30 meters) from other people and animals when scalping. Do not attempt this procedure
if there is any chance flying debris could injure operator, other people or cause damage to property.
6. OPERATING AS AN EDGER (Fig. 5-2D). With the unit configured as an edger, hold it so the motor is to your left
side so that debris is thrown to the rear. Always use eye protection.
7. SWEEPING - DO NOT SWEEP WITH TRIMMER (Fig. 5-2E)
8. DO NOT BUMP TRIMMER ON CONCRETE. This can damage the stringhead (Figure 5-2F).
F
R
A
N
C
A
I
S
3. POUR COUPER L’HERBE AUTOUR DES CLÔTURES ET DES FONDATIONS. Pour couper l’herbe autour des
clôtures grillagées, des palissades, des murs et des fondations, avancer lentement de manière à couper l’herbe au
ras de l’obstacle sans que le fil de coupe vienne le fouetter, ce qui risquerait de casser le fil ou l’effilocher. Si le fil
vient en contact avec une clôture grillagée, il cassera.
4. POUR COUPER L’HERBE AUTOUR DES ARBRES. Approacher lentement de arbres, de manière que le fil de
coupe ne fouette pas l’écorce. Faire le tour des arbres dans le sens des aiguilles d’une montre. Couper avec la
pointe du fil de coupe en inclinant légèrement le coupe-herbe vers l’avant.
5. RASAGE (Fig. 5-2C). Le rasage consiste à couper la végétation au ras du sol. Pour ce faire, incliner la tête de
coupe à gauche à un angle d’environ 30 degrés. Le réglage de la poignée permettra de mieux contrôler le coupe-
herbe pendant cette opération. S’assurer qu’aucune personne ou qu’aucun animal ne soit présent dans un rayon
de 30 mètres. Ne jamais essayer de raser une zone où des débris risquent d’être projetés et causer des dommages
corporels ou matériels.
6. UTILISATION EN TANT QUE TAILLE-BORDURE(Fig. 5-2D). L’appareil étant réglé en tant que taille-bordure, le
maintenir de façon que le moteur soit à gauche pour que les débris soient projetés vers l’arrière. Toujours porter
des lunettes de sécurité.
7. BALAYAGE - NE PAS UTILISER LE COUPE-HERBE POUR BALAYER (Fig. 5-2E)
8. NE PAS HEURTER LE BETON AVEC LE COUPE-HERBE. Cela risquerait d'endommager la tête de fil (Figure 5-
2F).
E
S
P
A
Ñ
O
L
3. CORTE EN ORILLAS. Acerque el cabezal a las orillas que desea cortar, inicie el proceso de corte acercando poco
a poco a el objeto conde quiere cortar las orillas de pasto , corte pero no acerque tanto que toque el objeto ya que
el hilo se romperá.
4. ORILLAR ALREDEDOR DE ARBOLES. Corte alrededor de arboles sin tocar la corteza del árbol, utilice la guÌa
de corte para que por ningún motivo toque el árbol, puede dañar al árbol si le llega a cortar la corteza del mismo.
5. REMOVER VEGETACIÓN (Fig. 5-2C). Gire la unidad 30 grados hacia la izquierda. Ajustando el maneral tendrá
mejor control de esta operación. Siempre mantenga una distancia de 100 pies ( 30 metros) de cualquier persona
o animal . No intente hacer esta operación si existe la posibilidad de que alguna partÌcula pudiera dañar al oper-
ador, a otras personas o pueda dañar objetos .
6. OPERACIÓN COMO ORILLADOR (Fig. 5-2D). Con la unidad configurada como orillador, sujétela con el motor a
la izquierda, de tal forma que las partÌculas sean lanzadas hacia atrás. Siempre utilice protector para los ojos.
7. BARREDOR - NUNCA UTILICE SU UNIDAD PARA ESTE TRABAJO (Fig. 5-2E)
8. NO HAGA FUNCIONAR EL RECORTADOR SOBRE HORMIGÓN. Esto podría dañar el cabezal de cuerdas (Figura 5-
2F).
5-2A 5-2B 5-2C
5-2D 5-2E
5-2F