


CARBURETTOR
ADJUSTMENT
We suggest carburetor adjustments are made by an authori-
zed servicing dealer.
The carburetor has three adjustment screws:
• L: The needle screw L governs the fuel flow at low speed
and also the acceleration from low to full speed.
To set screw L: close screw L turning it clockwise without
forcing.
Then open screw 1 full turn (counterclockwise) .
If acceleration is not smooth, open another 1/8 turn to
increase fuel flow .
• H: The needle screw H governs fuel flow at high speed
(throttle valve fully open).
To set hi speed screw H: close screw H turning it clockwi-
se without forcing .
Then open screw 1 full turn (counterclockwise) .
If the engine speed is too high, open the screw about 1/8
turn (counterclockwise). Optimal adjustment is found
between 1 and 1 1/4 turns.
• I: The I (IDLE) screw controls the throttle opening to
govern idle speed (2800 min
-1
) adjust as necessary.
CAUTION: increased idle speed may cause chain movement.
The carburetor is adjusted for normal operation during produc-
tion. When considerable changes of altitude require a supple-
mentary adjustment, contact an authorised service station
which offers the latest in tools, parts and technical assistance.
ROUTINE MAINTENANCE
Ensure engine is always switched off before any kind of
maintenance operation.
CHAIN: Check tension regularly. A new chain will require
more frequent adjustment. Loosen retention nuts. Tighten
chain (see assembly instructions). Tighten retention nuts and
adjust.
1 BAR
– Clean the bar groove (K) and check the lubrication holes
(L) in the bar to ensure that they are not clogged.
– Grease sprocket periodically. Rotate sprocket and
repeat.
– Rotate bar periodically to maximise bar life.
2 AIR FILTER
– A dust clogged air filter may cause carburetor problems.
This may prevent the engine from reaching its maximum
r.p.m. and cause high fuel consumption.
– Remove cover.
– Wash filter in petrol (do not use fuel which is mixed with
oil).
– The filter can also be cleaned with compressed air.
– Replace filter if damaged or if it does not seal tightly in
the air box.
3 SPARK PLUG
Remove and clean the spark plug every 30 hours. Check
the electrode gap (0,5/0,6 mm. - 0.025 inches).
– Replace spark plug about every 100 working hours or
whenever it is extremely encrusted.
– Heavily encrusted electrodes can result from an incorrect
carburetor setting or from wrong fuel mixture (too much
oil in the fuel mix) or a poor quality of oil in the fuel mix.
Check and correct.
4 OIL FILTER
The oil filter is on the end of the oil suction hose inside the
oil tank.
To clean and replace the filter pull it out through the oil tank
filter opening. Use a piece of bent wire or long forceps.
To remove deposits from the oil tank half-fill it with kerose-
ne or petrol and shake thoroughly. Drain off and fill the
tank with fresh saw chain oil.
Never use waste oil.
5 FUEL FILTER
To change fuel filter remove the tank cap and pull out the
filter with a piece of bent wire or long forceps. Replace the
filter as shown in the illustration and reposition it.
It is recommended to replace the fuel filter at least once a
year.
CHAIN BRAKE
– WARNING: Contact your service dealer if anything
appears wrong with your chain brake. Do not disassem-
ble or manipulate the mechanism of the chain brake.
– Clean the brake mechanism periodically (without disas-
sembling it) and control the wear of the band visually.
• PERIODICALLY: It is important to clean the saw thoroughly
particularly around cylinder fins to avoid overheating of the
engine.
• LONG STORAGE: Empty fuel and run engine until dry.
SAFETY CHAIN BRAKE
Your chain saw is fitted with a safety chainbrake desi-
gned to stop the chain in milliseconds in case of kick-
back. Always hold the saw firmly in both hands.
The chain brake does not provide a total protection if the
machine is used without taking the necessary precautions
and maintenances.
The chain brake is intended to engage automatically in case
of kickback.
The chain brake can also be engaged manually by pushing
the chain brake lever forwards.The manual use of the chain
brake is recommended only at idle.
Always test the chain brake before using your saw. Do this by
engaging the brake at idle (see below).
Always release the brake before starting.
Kickback may occur if the end of the bar (see illustrated
angle) touches any solid object.
Never attempt to start a cut with the end of the bar.
Kickback is a violent upward and rearward movement of the
bar and may cause you to lose control of the machine.
Therefore you should avoid starting a cut with this part of the
bar. Always keep a firm grip on the saw with both hands
because, in case of kickback, it is the contact of the left hand
with the brake lever which will help to engage the brake.
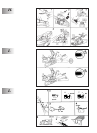
CHAIN BRAKE TESTING:
1 The chain brake (A) is disengaged when brake lever is pul-
led back and locked(chain can move).
4
UK
G
H
I