10
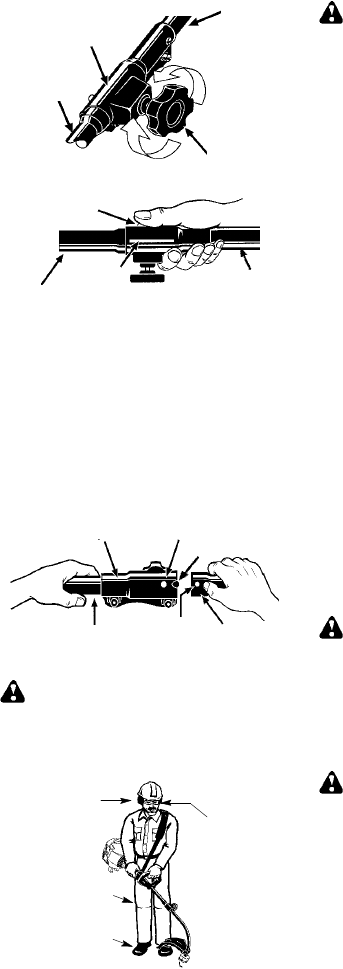
Coupler
Knob
LOOSEN
TIGHTEN
Upper Shaft
Lower
Attachment
2. Press and hold the locking/release button.
L
ocking
/
Release
Button
Coupler
Upper Shaft
Lower Attachment
3. Whilesecurelyholding theengineandup-
per shaft, pull the attachment straight out
of the coupler.
INSTALLING OPTIONAL ATTACH-
MENTS
1. Remove the shaft cap f rom the at tach-
ment (if present).
2. Position locking/release button of attach-
ment into guide recess of coupler.
3. Push theattachment intothe coupleruntil
the locking/release button snaps into the
primary hole.
4. Beforeusing theunit, tightenthe knobse-
curely by turning clockwise.
Coupler
Primary Hole
Upper
Shaft
Locking/
Release
Button
Attachment
Guide Recess
WARNING: Make sure the locking/
release button is locked in the primary hole
and theknob is securely tightened before op-
erating the unit.
OPERA TING POSITION
Eye Protection
Long Pants
Heavy Shoes
A
L
W
A
Y
SWE
A
R:
Cut f rom your right to your left.
Hearing
Protection
WARNING: Always wear eye protec-
tion and hearing protection. Never lean over
the trimmer head. Rocks or debris can rico-
chet or be thrown into eyes and face and
cause blindness or other serious injury.
Do not run the engine at a higher speed than
necessary. The cutting line will cut efficiently
when the engine is run at less than full throttle.
At lower speeds, there is less e ngine noise and
vibration. The cutting line will last longer and will
be l ess likely to “weld” onto the spool.
Always release the throttle trigger and allow the
engine to return to idle speed when not cutting.
To stop engine:
S Release the throttle trigger.
S Move the ON/OFF switch to the OFF posi-
tion.
TRIMMER LINE ADVANCE
Thetrimmerlinewilladvanceapproximately2
in. (5cm) each timethe bottom of thetrimmer
head is tapped on the groundwith the engine
running at full throttle.
The m ost efficient line lengthis t hemaximum
length allowed by the line lim iter.
Always keep the shieldin placewhen thetool
is being operated.
To advance line:
S Operate the engine at full throttle.
S Holdthe trimmerheadparallelto andabove
the grassy area.
S Tap the bottom of the trimmer head lightly on
the ground one time. Approximately 5 cm of
line will be advanced with each tap.
Always tap the trimmer head on a grassy
area. Tapping on surfaces such as concrete
or asphalt can cause excessive wear to the
trimmer head.
If the line is worn down to 5 cm or less, more
than one t ap will be required to obtain the
most efficient line length.
WARNING: Use only 2 mm diameter
line.Othersizesandshapesof linewillnotad-
vanceproperly andwill resultin impropercut-
tinghead f unctionorcancauseseriousinjury.
Do not use other materials such as wire,
string, rope, etc. Wire can break off during
cutting and become a danger ous missile that
can cause serious injury.
CUTTING METHODS
WARNING: Useminimum speedand
do not crowd the line when cutting around
hard objects (rock, gravel, fence posts, etc.),
whichcandamagethetrimmer head,become
entangled in the line, or be thrown causing a
serious hazard.
S The tip of the line does the cutting. You will
achieve the best performance and mini-
mum linewear by not crowding the lineinto
the cutting area. The right and wrong ways
are shown below.


