


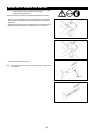


13
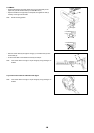
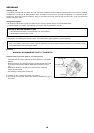
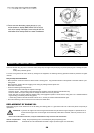
Turn the machine upside down, and you can replace the cutter blade or the
nylon cutting head easily.
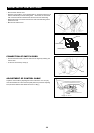
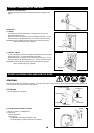
– Insert the hex wrench through the hole in the gear case and rotate the
receiver washer (4) until it is locked with the hex wrench.
– Loosen the nut (1) (left-hand thread) with the socket wrench and remove the
nut (1), cup (2), and clamp washer (3).
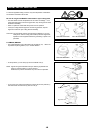
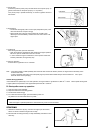
Mounting of cutter blade
With the hex wrench still in place.
– Mount the cutter blade onto the shaft so that the guide of the receiver washer
(4) fits in the arbor hole in the cutter blade. Install the clamp washer (3), cup
(2), and secure the cutter blade with the nut (1).
[Tightening torque: 13 - 23 Nm]
፧
NOTE: Always wear gloves when handling the cutter blade.
NOTE: The cutter blade-fastening nut (with coned disc spring) is a consumable
part.
If there appears any wear or deformation on the coned disc spring,
replace the nut.
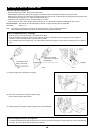
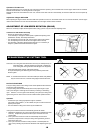
Mounting of nylon cutting head
– The clamp washer (3), cup (2), and nut (1) are not necessary for mounting
the nylon cutting head. The nylon head should go on top of the receiver
washer (4).
– Insert the hex wrench through the hole in the gear case and rotate the
receiver washer (4) until it is locked with the hex wrench.
– Then screw the nylon cutting head onto the shaft by turning it
counter-clockwise.
– Remove the hex wrench.
– Make sure that the blade is the left way up.
MOUNTING OF CUTTER BLADE OR NYLON CUTTING HEAD
፧
Rotation
Tighten
Hex wrench
፧
Loosen
፧
(2)
(1)
(4)
(3)
፧
(4)