31
Section 6: Maintenance & Lubrication
3/18/15
SBL2566, SBL2574, & SBL2584 with S/N 891531+ Snow Blowers 370-478M
Table of Contents
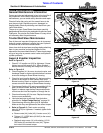
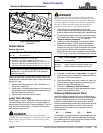
Grader Blade Replacement
Figure 6-6
Grader Blade
Refer to Figure 6-6:
Inspect cutting edge of grader blade and plow bolts for
wear and rotate 180
o
or replace as needed. Make sure
grader blade is replaced before auger housing becomes
exposed to wear.
1. Remove hex flange lock nuts (#2), plow bolts (#1),
and grader blade (#3).
2. Attach new or rotated grader blade (#3) to bottom of
Snow Blower frame with existing/new plow bolts (#1)
and hex flange lock nuts (#2).
3. Tighten lock nuts to the correct torque.
Long Term Storage
Clean, inspect, service, and make necessary repairs to
the Snow Blower when parking it for long periods and
when parking it at the end of a working season. This will
help ensure the Snow Blower is ready for field use the
next time you hook-up to it.
!
DANGER
Always disconnect driveline from tractor PTO before
servicing drive train components or underside of unit. Snow
Blower can be engaged if tractor is started causing bodily
injury or death.
35609
Grader Blade Part Numbers
Part No. Part Description
1. 802-206C PLOW 5/8"-11 x 1 3/4" GR5
2. 803-263C NUT HEX FLANGE LOCK 5/8"-11 PLT
3. 820-042C SBL2566: GRADER BLADE 1/2" x 6" x 65 1/2"
3. 820-477C SBL2574: GRADER BLADE 1/2" x 6" x 73 1/2"
3. 820-046C SBL2584: GRADER BLADE 1/2" x 6" x 83 1/2"
NOTE: When front edge of grader blade (#3) is worn
excessively, it can be rotated 180
o
and reused to
extend its wear life.
!
DANGER
Always secure Snow Blower in the up position with solid
supports before servicing underside of Snow Blower. Never
work under equipment supported by hydraulics. Hydraulics
can drop equipment if controls are actuated or if hydraulic
lines burst. Either situation can drop the Snow Blower
instantly even when power to hydraulics is shut off.
1. Clean off any dirt and grease that may have
accumulated on the Snow Blower and moving parts,
and then wash surface thoroughly with a garden hose.
2. Check impeller, auger, wear bars, and skid shoes for
wear and breaks. Repair or replace if necessary. See
“Auger & Impeller Inspection”
on page 29.
3. Inspect for loose, damaged, or worn parts. Make
adjustments, repairs, and/or replace as needed.
4. Repaint parts where paint is worn or scratched to
prevent rust. Ask your Land Pride dealer for aerosol
touch-up paint. Paint is also available in touch-up
bottles with brush, quarts, and gallon sizes by adding
TU, QT, or GL to the end of the aerosol part number.
5. Replace all damaged or missing decals.
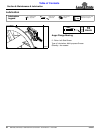
6. Lubricate as noted under “Lubrication” on page 32.
7. Apply a coating of oil to the areas without paint due to
high wear to minimize oxidation.
8. Store Snow Blower on a level surface in a clean, dry
place. Inside storage will reduce maintenance and
make for a longer Snow Blower life.
9. Follow all “Unhooking The Snow Blower”
instructions on page 14 when disconnecting Snow
Blower from skid steer/tractor.
Ordering Replacement Parts
Land Pride offers equipment in factory standard beige
with black highlights. Equipment may also be purchased
in orange. Special attention must be given to the part
number to prevent ordering the wrong color. A suffix
number corresponding to one of the colors below must be
added at the end of the part number. Parts ordered
without the suffix number will be supplied in factory
standard colors.
For example, if you are ordering a replacement part with
part number 555-555C and the existing part is orange,
then add the suffix 82 to the end of the number to make
the part number read 555-555C82.
Land Pride Aerosol Touch-up Paint
Part No. Part Description
821-011C PAINT LP BEIGE AEROSOL SPRAY CAN
821-002C PAINT LP BLACK AEROSOL SPRAY CAN
821-066C PAINT ORANGE AEROSOL SPRAY CAN
82 . . . . . . Orange 85 . . . . . . .Black


