


10
II. Time Setting
Note:
This is only necessary if you do not wish to wait for the
WWVB reception. All manual set data will be over-ridden by the
reception of the WWVB signal based on the time zone selected.
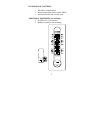
1. Press and hold the “SET” button (on the back of the
clock) for 2 seconds or until “12h” or “24h” flashes.
2. Press and release the “SET” button again, the hour
will flash.
3. Press and release the “+” button to advance the hour.
Note:
In 12h mode “PM” will appear to the left of the
time during PM hours. If the time is not within the PM
hours nothing will be displayed. Be sure to set the time to
the correct AM/PM time to ensure automatic reception.
4. Press and release the “SET” button, the digits that
represent the minutes will flash.
5. Press and release the “+” button to advance the
minutes.
6. Press and release the “SET” button to confirm and
advance to the time zone setting (skip step 1 and 2 in
section III if continuing).
III. Time Zone Setting
The default (factory set) time zone is EST (Eastern Standard Time)
1. Press and hold the “SET” button for 5 seconds or
until “12h” or “24h” flashes.
2. Press and release the “SET” button three more times,
“EST” will flash (or other time zone if changed
previously).