


5
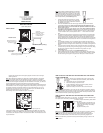
FUNCTION KEYS:
Weather Station:
The Weather Station has 4 easy-to-use function keys.
SET key
x Press and hold to enter manual setting modes: LCD contrast, Manual time setting,
12/24 hour time display, Calendar setting, ºC/ ºF temperature unit, Wind speed unit,
Rainfall unit, Pressure unit, Relative pressure reference setting, Weather tendency
threshold setting
x Press to toggle between the display of Mode 1 or Mode 2:
Mode1: "Wind speed + outdoor temp + rel. pressure"
Mode 2: "Gust + Dew Point temp + rainfall data (only if there is a rain sensor-
optional)"
(Mode 2 displayed will be shown for 30 seconds. Then it will return to normal display
x Press to activate the reset mode when MAX or MIN record is shown
+ key
x In display Mode 1, press to toggle the date, weekday, + date, Indoor temp, or sec
x In display Mode 2, press to toggle the Relative Pressure, 24 hour rainfall and Total
rainfall (if there is a rain sensor- optional).
x Press to adjust (increase) the level of different settings
x Press to confirm to reset the MIN/MAX record
HISTORY key
x Press to display the weather data history records or exit manual setting mode
MIN/MAX key
x Press to display MIN/MAX records of various weather data or adjust (decrease) the
level of different settings
MIN/MAX key
SET ke
y
+ key
HISTORY ke
y
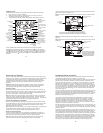
6
Air pressure
history histogram
LCD SCREEN
The LCD screen is split into 3 sections displaying the following information:
1. Time and date/ indoor temp/ second
2. Wind data, outdoor temperature and humidity, dew point, weather forecast icon and
tendency indicator
3. Air pressure history, relative air pressure, rainfall data (optional)
When the signal from the transmitter/ or Rain sensor (optional) is successfully received by
the Weather Station, the
icon will be switched on. (If not successful, the icon will not
be shown on the LCD). User can therefore easily see whether the last reception was
successful (“ON”
icon) or not (“OFF” icon). On the other hand, the short blinking of
the
icon shows that a reception is being done at that time.
* In normal display user may press the SET key shortly to toggle between Mode1 and
Mode 2 display:
Wind speed / gust* in
mph, km/h, m/s
Calendar / indoor
temperature / seconds
display
Weather tendenc
y
indicato
r
Time display
Outdoor relative
humidity in %
Weather forecast
Icon
Relative air pressure /
24 hr rainfall / Total
rainfall display* (only if
there is a rain sensor
being used)
Wind Chill in
ƱC or ƱF
Low battery indicator
(weather station)
Transmitter signal
reception icon
Low battery
indicator #
(transmitter)
Outdoo
r
temperature
/ dew point*
in qC or qF
MI/MAX icons
HISTORY
icon
Low batter
y
indicator (rain
sensor - optional)
7
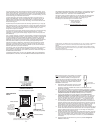
Mode 1: Wind speed, outdoor temperature, relative air pressure are shown.
Mode 2: Wind gust, dew point, and rainfall (optional) reading are shown.
Note: To view the rainfall data, press the + key after entering Mode 2 display.
Wind gust icon
Dew point icon
Rainfall icon
In Mode 2, this reception
icon is showing the
condition of the reception
of the signal from Rain
sensor (only if a rain
sensor is being used)
Wind speed icon
Outdoor temp
icon
Rel. Air Pressure icon
In Mode 1, this reception icon is showing the condition of the
reception of the signal from Thermo-hygro transmitter
Transmitter signal reception icon
8
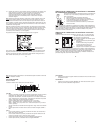
MOUNTING THE UNITS:
Using 915MHz wireless transmission gives users little restriction on placement because all
units can be positioned virtually anywhere within a 330 ft / 100 meters radius of the base
station. Please ensure that the cable included in this set meets your distance
requirements (see accessories in the main user manual for adding extension cables).
Important: Ensure all signals can be received and/or all cable distances meet with your
requirements at the point of fixing particularly before you start drilling any mounting holes.
Wind sensor
Secure the main unit to the shaft of the mast holder using the single screw provided with
the front of the sensor (marked E) facing in the East-West direction otherwise wind
direction will not be accurate. Now fix the entire unit to a suitable mast using the U-bolt,
washers and nuts found in this set.
Note: For best results mount the wind sensor onto a mast to allow the wind to freely travel
from all directions to enable an accurate reading (ideal mast size should be from Ø
5
/
8
” to
1
1
/
4
”). Ensure that the cable of the wind sensor meets your distance requirements
Thermo-hygro Sensor
To wall mount the thermo-hygro sensor, fix the wall holder onto the desired wall (2 screws
are supplied), plug the sensor firmly into the wall holder and then carefully replace the rain
cover back over the thermo-hygro sensor.
Note: After mounting the units, should the weather data not be received, user may need to
remove the batteries from all units and redo the set-up procedures after about 5 minutes.
Rain sensor (optional)
The rain sensor should be mounted horizontally about 2-3ft off from the ground (or higher)
in an open area away from trees or other coverings to allow rain to fall naturally for an
accurate reading.
Note: For best results ensure the base is horizontal to allow maximum drainage of any
collected rain
WARRANTY INFORMATION
La Crosse Technology, Ltd provides a 1-year limited warranty on this product against
manufacturing defects in materials and workmanship.
This limited warranty begins on the original date of purchase, is valid only on products
purchased and used in North America and only to the original purchaser of this product.