7
1071288-AN2-F 09/03/12
3. Install the adapter onto one of the nipples using the 11 mm bit (supplied), 11
mm or 7/16” socket, the extension and the socket wrench.
Note! Use masking tape to hold the bit in place, as the bit could fall off and
cause damage.
Important! The concealing plate should sit loosely at this point. If it is tight
against the ceiling, use a longer pipe nipple.
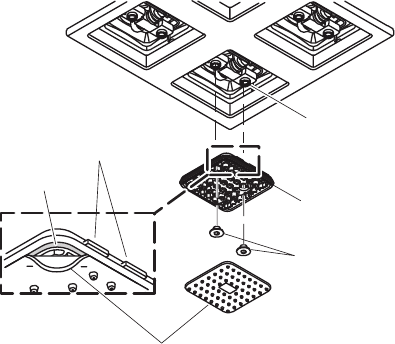
4. Align the groove in the waterway with the double ribs on the leak shield.
5. Press the waterway into place over the adapter. Secure the waterway to the
adapter with the screw.
6. Make sure that the concealing plate does not turn or move.
Important! If the concealing plate is still loose after this step, then use a shorter
pipe nipple.
7. Repeat the procedure for the remaining waterways.
Ribs
Hex Screws
Groove
Waterway
Sprayhead
Nozzle Membrane
Install the Trim
Install the Sprayhead
1. With the ribs of the sprayhead facing upwards, attach the sprayhead to the
waterway.
2. Using a 3/16” hexagonal wrench, install the hexagonal screws to secure the
sprayhead in position. Do not overtighten.
3. Check the sprayhead for upward and downward movement and make sure
that it sits squarely within the concealing plate.
4. Place the nozzle membrane over the sprayhead.
5. Align the long edge of the membrane with the hinge ribs (horizontal).
Note! For optimum performance, make sure that the membrane is applied
evenly.


