


8
FINISHING MOWER ASSEMBLY INSTRUCTIONS
STEP 1
With finishing mower still in crate, lay flat on a level surface. Remove the top
& side sections of the crate, leaving the finishing mower resting on the bot-
tom section. Set aside PTO shaft and tail wheel arm assemblies.
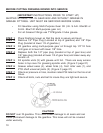
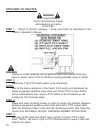
STEP 2
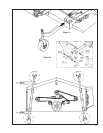
Insert tail wheel arms as shown in Figure A and tighten both the bolt &
jam nut.
STEP 3
Remove swivel links and lift pins that are wired on the lift arm “A” frame.
Set aside for step 5.
STEP 4
Remove the 4 bolts from the lift arm “A” frame.
Note: There are 2 different lengths of bolts.
STEP 5
Insert the swivel links in the center lift plate channel using the longer of
the 2 bolts, on each side as shown in figure B.
STEP 6
Attach the other end of each swivel link to the outside lower hole on the
lift arm “A” frame using the shorter bolts as shown in Figure B.
STEP 7
Attach the Category 1 lift pins as shown in Figure B.
STEP 8
Tighten all nuts and bolts.