


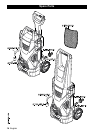

8 English
Mount loose parts delivered with appliance
prior to start-up.
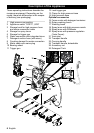
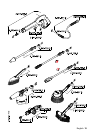
Illustrations on Page 6 and 7
Illustration
Î Insert the transport wheels and lock them.
Illustration
Î Attach the transport handle /carrying
handle.
Illustration
Î Pull out the clamp for the high-pressure
hose from the hand spray gun (e.g. a
Philips screwdriver).
Illustration
Î Connect high pressure hose to trigger
gun.
Î Push the clamp in until it locks. Check
the secure connection by pulling on the
high-pressure hose.
Optional
Illustration
Î Pull the suction hose for detergent
through the cover of the detergent tank
until the filter contacts teh bottom of the
tank.
Î Close the detergent tank with the lid.
Î Lock the detergent tank in place on the
appliance.
Illustration
Î Hook the accessories net into the hooks
shown in the illustration.
According to the applicable regula-
tions, the appliance must never be
used on the drinking water supply
without a system separator. Use a
suitable system separator manufactured by
KÄRCHER; or, as an alternative, a system
separator as per EN 12729 Type BA. Water
flowing through a system separator is con-
sidered non-drinkable.
Caution
Always connect the system separator to the
water supply, never directly to the appliance!
Note: Impurities in the water can damage
the high-pressure pump and accessories.
For protection, the use of the KÄRCHER
water filter (optional accessory, order no.
4.730-059) is recommended.
Observe regulations of water supplier.
For connection values, see type plate/tech-
nical data.
Î Use a fibre-reinforced water hose (not
included) with a standard coupling.
(Minimum diameter 1/2 inch (13 mm),
minimum length 7.5 m).
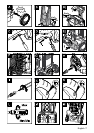
Illustration
Î Screw the supplied coupling element to
the water connection on the appliance.
Î Push the water supply hose onto the
coupling unit, then connect it to the wa-
ter supply.
Caution
Dry runs lasting longer than two minutes
lead to damages to the high pressure
pump. If the appliance does not build up
pressure within two minutes, switch it off
and proceed as instructed in the Chapter
"Troubleshooting".
Illustration
Î Connect the high pressure hose to the
high pressure connection of the appli-
ance.
Illustration
Î Push the spray lance into the trigger
gun and fasten it by turning it through
90°.
Î Completely open the water tap.
Î Insert the mains plug into the socket.
Î Turn on the appliance “I/ON”.
ṇ Danger
The trigger gun is subjected to a recoil force
when the water jet is discharged. Make sure
that you have a firm footing and are also hold-
ing the trigger gun and spray lance firmly.
Illustration
Î Unlock the lever on the trigger gun.
Î Pull on the lever of the trigger gun; the
device will switch on.
Operation
Before Startup
Water supply
Water supply from mains
Start up
Operation