


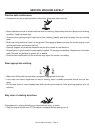
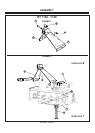


RT 1157 - 1165
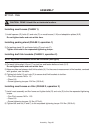
CAUTION: FIRMLY block tiller on horizontal surface.
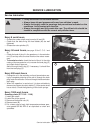
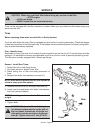
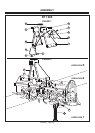
Installing mast braces (PHASE 1)
1) Install spacers (D), bolts (E) and nuts (C) on mast braces (I, M) and adaptation plates (A,B)
Do not tighten bolts and nuts at this time.
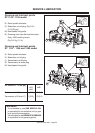
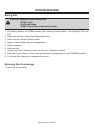
Installing parking stand (PHASE 2, operation 1)
3) Put parking stand (N) and fasten bolts (O) and nuts (P).
Tighten lock nuts to the requested tightening torque.
Installing draft link brackets (PHASE 2, operation 2)
NOTE: big holes on brackets should be on bottom (see fi gure)
4) Put each link bracket (U) and (T) on tool bar and fasten bolts and nuts (V, Z).
Do not tighten bolts and nuts at this time.
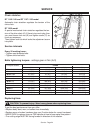
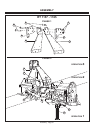
5) Measure distance between draft link brackets (U). For the correct measurement of the brackets, centered
with gearbox, see the table.
6) Tighten lock bolts (V) and nuts (Z) to secure draft link brackets to tool bar.
• Fine Pitch screws: M16 x 1.5
• Class: 8.8
• Screw tightening torques: 214 Nm (158 lb-ft).
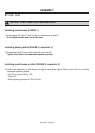
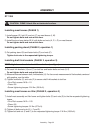
Installing mast braces on tiller (PHASE 2, operation 3)
7) Install mast assembly on tiller frame and tighten bolts (R) and nuts (S) to the the requested tightening
torque.
• Fine Pitch screws: M12 x 1.25
• Class: 8.8
• Screw tightening torques: 91 Nm (67 lb-ft).
8) Tighten bolt and nut (E and C) to the requested tightening torque: 214 Nm (158 lb-ft).
ASSEMBLY
Assembly - Page 30