3
iOptron Corp. | 6E Gill Street | Woburn, MA 01801 USA | (781) 569-0200 | Toll Free (866) 399-4587 | www.iOptron.com
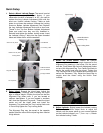
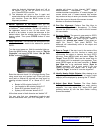
5. Install Counterweight (CW) Shaft: (1) Remove CW
Shaft Locking Screw from the CW Mounting Nose. (2)
Insert CW shaft into the CW Mounting Nose as
indicated in 2
nd
photo below. (3) lock it using CW Shaft
Locking Screw from the other side of the CW
Mounting Nose. Tighten the Front CW Positioning
Screw which is located in front of the CW Mounting
Nose.
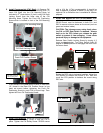
CW Shaft Locking Screw
CW Mounting Nose
(1)
(2)
(3)
Front CW Position Screw
If the latitude of the observation location is lower than
10º, thread in the Rear CW Position Screw (a hex
head set screw) before tightening the Front CW
Positioning Screw to avoid CW hit tripod legs. Then
tighten the Front CW Positioning Screw.
Rear CW Position Screw
6. Install Counterweight
: Mount the CW onto CW shaft.
Tighten the CW Locking Screw to hold the CW in
place. Tighten the CW Safety Screw. ZEQ25 comes
with a 10.4 lbs (4.7kg) counterweight. It should be
able to balance a payload of about 13 lbs (6kg). An
optional CW or Extension bar is available for heavier
payload.
7. Attach and Balance an OTA on the Mount
: After
attaching an OTA and accessories to the mount, the
ZEQ25 mount must be balanced in both R.A. and
DEC to ensure minimum stress on the mount (such as
gears and motors inside).
CAUTION: The telescope may swing freely when
the R.A. or DEC Gear Switch is released. Always
hold on to the OTA before you release the gear
switch to prevent it from swinging. It can cause
personal injury or damage to the equipment.
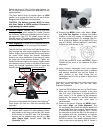
Release Gear Switch Locking Screw by turning it 2
turns counterclockwise. Turn Gear Switch Knob 90
degree to OPEN position to disengage the worm from
the worm wheel.
Gear Switch Locking Screw
Gear Switch
LOCK
OPEN
Rotate the DEC axis to horizontal position. Adjust the
CW position to balance the mount in R.A. axis and
move the OTA position to balance the mount along
DEC axis.
R.A. balance
DEC balance
CW Shaft inserts into
CW mountin
g
nose.


