


3
iOptron Corp. | 6E Gill Street | Woburn, MA 01801 USA | (781) 569-0200 | Toll Free (866) 399-4587 | www.iOptron.com
5. Connect Cables: Attach one end of a RJ-11 cable into the socket on the side of the DEC unit and the other end into
the DEC port located on R.A. unit. Using another RJ-11 cable to connect the hand controller to the HBX port located
on the R.A. unit. Plug 12V DC power supply into the POWER socket on R.A. unit. The power indicator on the R.A. unit
will be on when the power switch is turned on.
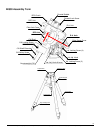
6. Polar Alignment:
In order for an equatorial mount to track properly, it has to be accurately polar aligned. The mount
has been set to face north (in Northern Hemisphere) as indicated in Step 1. The latitude has been roughly set, as
indicated in Step 3.
Take off the Polar Axis Cover and Polar Scope Cover. Look through the polar scope eyepiece to locate the Polaris. If
the hole is blacked by the DEC axle, use the ▲ or ▼ button on the hand controller to turn the DEC axle to unblock the
Polar Scope view. (You may use the number button to change the slewing speed. 9 for MAX speed). Loosen the two
Azimuth Locking Screws and adjust the Azimuth Adjustment Knobs to do a fine adjustment of the mount to center the
Polaris in the azimuth direction. Tighten the locking screws to secure the mount. Loosen four Latitude Locking Screws
on the side of the mount, turning the Latitude Adjustment Knob to adjust the latitude (altitude). Use the Lever for a fine
adjustment to center the Polaris along the latitude direction. Re-tighten the locking screws.
With iOptron’s AccuAligning
TM
Polar Scope and Quick Polar Alignment procedure, you can do a fast and accurate
polar alignment. Please refer to on-line full manual for more detailed description.
7. Install Counterweight
: iEQ30 comes with one 10lb (4.5kg) counterweight (CW) and an extension shaft. Use CW or
CW and extension shaft to balance your OTA (Optical Tube Assembly). Tighten the CW Locking Screw to hold the
CW in place. Tighten the CW Safety Screw.
8. Attach and Balance an OTA on the Mount
: After attaching an OTA and accessories to the mount, the iEQ30 must
be balanced in both R.A. and DEC to ensure minimum stress on the mount (such as gears and motors inside).
CAUTION: The telescope may swing when the R.A. or DEC clutch is released. Always hold on to the OTA
before you release the clutch to prevent it from swinging. It can cause personal injury or damage to the
equipment.
Balance the mount in DEC axis
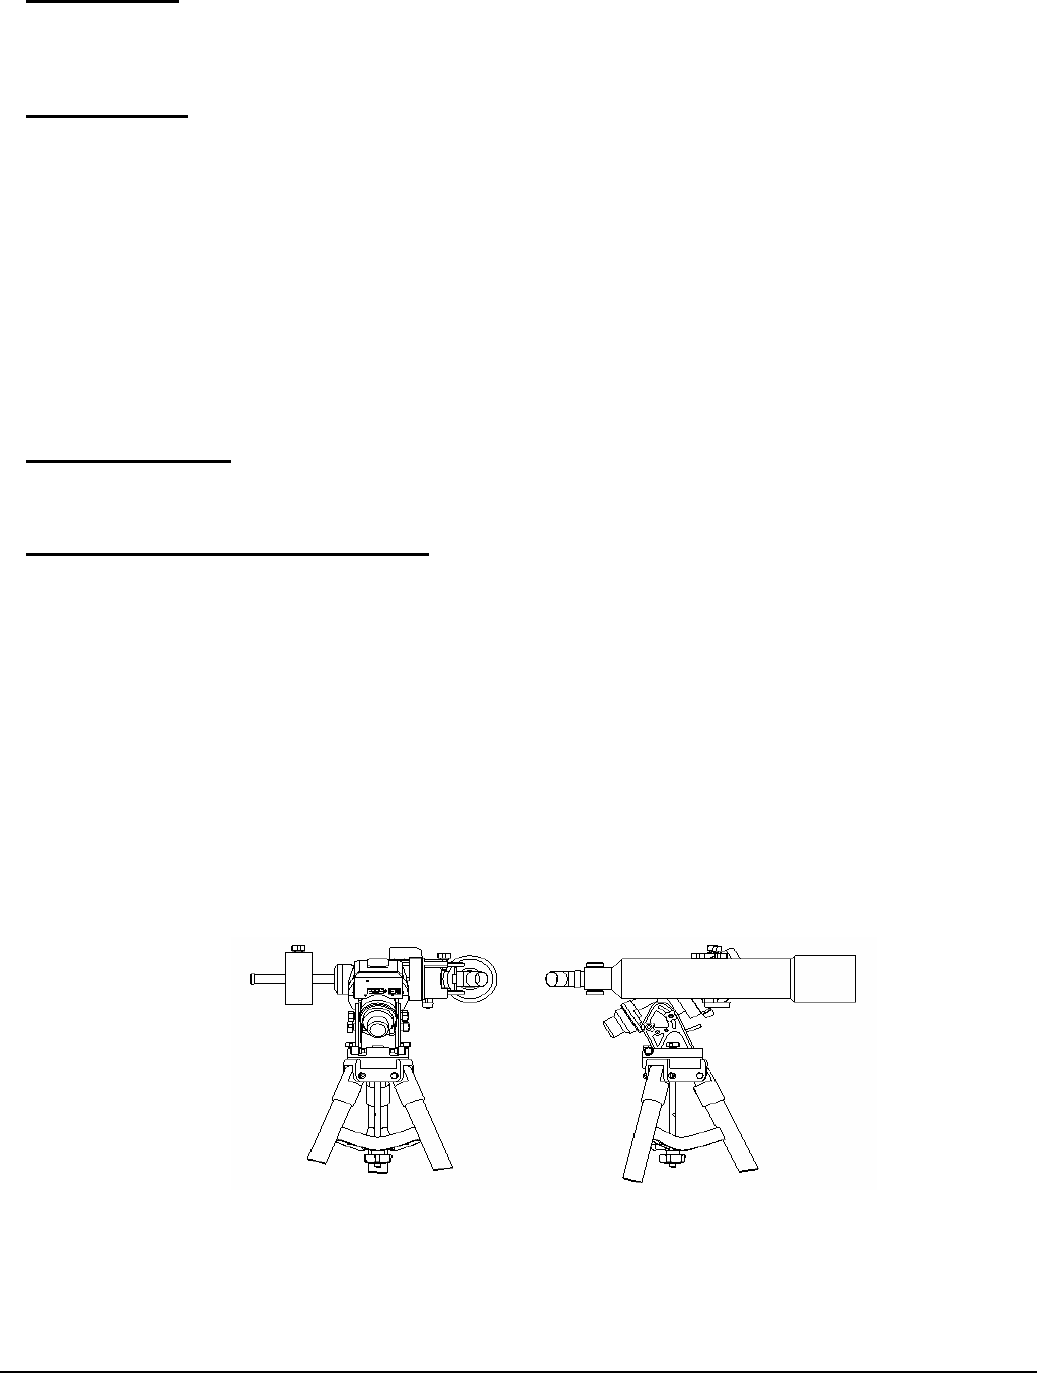
Release the R.A. Clutch and rotate the R.A. axis to place the DEC axis in the horizontal position, as shown in Figure
5(a), and then tighten the R. A. Clutch. The OTA can be on either side. Then release the DEC Clutch and rotate the
OTA to a horizontal position as shown in Figure 5(b). If the OTA has a tendency to rotate about the DEC axis, you will
have to slide the OTA forward or backward to balance it in the horizontal position about the DEC axis. When the OTA
is balanced horizontally, tighten the DEC Clutch.
Balance the mount in R.A. axis
Release the R.A. Clutch. If the DEC axis stays in the horizontal position, as shown in Figure 5(a), it means the R.A.
axis is balanced. Otherwise, release the CW Locking Screw and move the CW as required to balance the R.A. axis.
Tighten the CW Locking Screw.
Figure 5
The iEQ30 also equipped with a electronic balance test system to assist you for precise balance of the mount. Please
refer to the full on-line manual for balance procedures/tips.