5
SAFETY
TRANSPORTATION:
Turn off fuel valve and strap mower to trailer.
MAINTENANCE:
1. Keep all nuts, bolts and screws tight to keep mower in safe operating condition.
2. Engine maintenance should comply with engine manufactures specifications. See the engine
manual for specifications.
3. Never store the mower with gas in the tank inside a building where fumes can reach an open
flame or spark.
4. To reduce the risk of fire, keep the mower free of grass, leaves and excessive grease or oil.
5. Have your mower inspected and serviced each year by an authorized Husqvarna dealer.
6. Use only authentic Husqvarna replacement parts to insure the safety and quality of your
mower is maintained.
7. Safety decals should be replaced if they are missing or illegible. Decals can be purchased
from your Husqvarna dealer.
8. The hydraulic system including all hoses and fittings should be checked frequently for wear or
leaks. Never check for leaks with your hands, use a piece of cardboard or wood. Hydraulic oil
under pressure could be injected into your body and must be surgically removed within a few
hours.
EQUIPMENT SETUP AND ADJUSTMENTS
1. Uncrate mower
2. Mount front caster assemblies to the front deck using the fasteners provided on the deck (both
sides).
3. Cut the plastic wire ties holding the operator presence levers down.
4. Check tire pressure in all four tires. (rear tires 15 PSI, front tires 20-25 PSI)
5. Check engine oil with dipstick. Add if needed per engine manufactures specifications. (See
engine manual)
6. Check hydraulic oil level. Should be an 1.0” below the bottom of the fill tube.
7. Mount the discharge chute to the front deck using the fasteners provided on the deck.
CUTTING HEIGHT
1. Before changing cutting heights make sure the blades are off, key switch is off, and remove
spark plug wire or wires.
2. Cutting height ranges from 1 1/2” to 5” in 1/4” increments.
3. Cutting height can be changed three ways. Move one “C” spacer on the front casters,
change the blade spacers, or move the wheel motor assemblies.
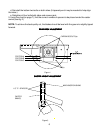
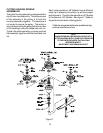
4. a. To change heights on the rear deck loosen, do not remove, the top two carriage bolts on
both sides. (see fig. 1a)
b. Place a jack under the center of the rear deck remove the bottom two nuts on both sides.
Then remove the bottom two bolts both sides. (May have to raise the jack slightly to remove
bolts.)(see fig. 1b)
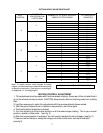
c. With the jack raise or lower the rear deck to the desired position using the chart, on page
7, to ensure proper height.


