


1 2 3
Tree thickness determines
technique
How you use the saw when felling is
decided in part by the thickness of the tree.
First we’ll look at what you do when the
bar is longer than the diameter of the tree.
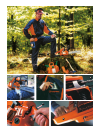
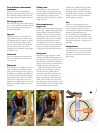
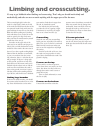
Working position
Stand with your legs apart and lean against
the tree trunk with your shoulder. To avoid
an unnecessarily high stump, make the
directional notch low.
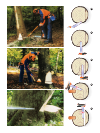
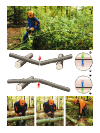
Top cut
Hold the saw at the correct angle and
sight towards the physical feature in the
surroundings that you selected. It should
coincide with the felling sights on the
top of the saw. Give the saw full throttle
and start sawing. From time to time,
check thatyou’rekeepingthe correct angle
and direction. (1)
Under cut
Stay in the same position and make the
under cut. Make sure you meet the top
cut exactly. (2)
Felling cut
When it’s time for the felling cut, you use
either a pushing or a pulling chain. Saw
until you have enough room to push in a
breaking bar or a felling wedge. Make sure
you don’t touch the breaking bar/felling
wedge with the chain when you continue
sawing. Leave a hinge that is as even in
thickness as possible. Remove the saw and
work the bar/wedge until the tree starts
to fall. (3)
Felling tools
Felling tools are used to prevent the
tree from falling in the wrong direction
or from pinching the blade while sawing.
The breaking bar is a felling tool for
smaller trees (4). For larger trees, a felling
wedge is best (5).
Directional notch,
large trees
When the bar is shorter than the diameter
of the trunk, a slightly more complicated
felling technique is required. The basic
principle is the same as in the previous
examples, but as the bar doesn’t reach
through the trunk, you have to complete
the directional notch from the other
side. Make sure that the new cuts meet
up with the old ones as closely as possible.
If you’re not particularly experienced,
it’s wise to have someone with you who is.
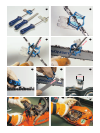
Plunge cut
What you’re going to do now is called
a plunge cut (6). With full throttle, start
by inserting the lower part of the bar nose
into the trunk, just behind the intended
hinge (7). Be careful not to touch the tree
with the upper part of the bar nose.
When the tip of the saw has moved
into the trunk a little bit, turn the saw
carefully until it is parallel with the
directional notch (8). Press the bar into
the tree (9). Then, saw away from the
hinge a small distance approximately the
width of the bar. This is to prevent you
from sawing into the hinge when you turn
the saw around. Now saw carefully around
the trunk. When you’ve passed the
middle, insert a felling wedge (10). Keep
sawing until the bar is parallel with the
directional notch on the other side (11).
You might need to hammer in the felling
wedge to get the tree to fall. Sometimes
several wedges are required.
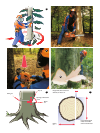
Rot
If the tree has rot damage, you have
to be very careful, and preferably get help
from an experienced person if you’re
not that skilled yourself. If the trunk looks
damaged or abnormal, there may
be a rot problem. The rot-damaged part
of the tree is discoloured and feels softer.
As rot weakens the tree, you have to make
the hinge much bigger, to get the tree to
fall safely.
Lodged trees
You should also get assistance from some-
one with experience if the tree gets stuck
in another tree on the way down. Don’t
leave the tree unattended if you have to
call for help.