


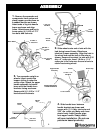


ASSEMBLY
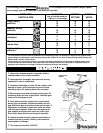
ASSEMBLYASSEMBLY
ASSEMBLY
1.
Remove the spreader and
components from carton and
place hopper up-side down on
a padded surface as shown.
Insert ends of leg into handle
brace as shown and align
holes. Attach brace and leg to
frame using (4) 1/4-20 x 2 1/4”
hex bolts and locknuts.
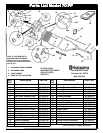
3.
Turn spreader upright on
wheels. Insert screen into
hopper sliding it under the
screen clips. Attach the upper
handle assembly to handle
brace with the handle lever
brackets facing as shown.
Secure with (4) 1/4-20 x 1 1/2”
hex bolts and locknuts.
5/32 Dia. x
1 1/4” Cotter
Pin
3/16 Dia. x
2” Cotter Pin
Drive Wheel
Free Turning
Wheel
Handle
Brace
Leg
1/4-20 X 2”
Hex Bolt
1/4-20
LOCKNUT
4.
Slide handle lever between
handle brackets as shown and
secure with (1) 1/4 dia. clevis pin and
3/32” dia. cotter pin. Make sure lever
pivots freely. Install handle grips
onto upper handle.
Soapy water
will ease installation. (Do not use
petroleum based products).
NOTE POSITION OF
LEVER BRACKETS
Upper Handle
Assembly
Screen
Screen Clip
1/4-20 X 1 1/2”
Hex Bolt
1/4-20 Locknut
1/4 Dia.
Clevis Pin
3/32” Dia.
Cotter Pin
Handle
Lever
Handle
Grip
2
2.
Slide wheels onto end of axle with the
hub facing toward frame. Wheels are
identical to ease assembly. Align the hole in
the wheel hub and the hole in the axle as
shown. Secure drive wheel to axle with 3/16
dia. x 2” cotter pin. Insert 1/8 dia. x 1 1/4”
cotter pin in the hole near the end of axle to
retain free turning wheel.