


28
CONSEJOS PARA SEGAR Y ACOL-
CHAR
IMPORTANTE: Para obtener el mejor
rendimiento mantenga la caja de la segadora
sin acumulacion de cesped y basura. Vea
“LIMPIEZA” en la seccion de Mantenimento de
este manual.
• La cuchilla acolchadora especial va a volver
a cortar los recortes de césped muchas
veces, y los reduce en tamaño, de modo que
si se caen en el césped se van a dispesar
entre éste y no se van a notar. También, el
césped acolchado se va a deshacer rápidam-
ente entregando substancias nutritivas para
el césped. Siempre acolche con la velocidad
del motor (cuchilla) más alta, pues así se
obtendrá la mejor acción de recorte de las
cuchillas.
• Evite cortar el césped cuando esté mojado.
El césped mojado tiende a formar montones
e interfi ere con la acción de acolchado.
La mejor hora para segar el césped es
temprano en la tarde. A esa hora éste se ha
secado y el área recién cortada no quedará
expuesta al sol directo.
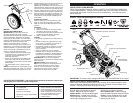
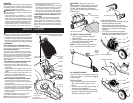
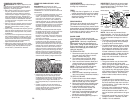
• Para obtener los mejores resultados, ajuste
la altura del corte de la segadora de modo
que ésta corte solamente el tercio superior
de las hojas de césped. En el caso de que el
césped haya crecido demasiado, puede ser
necesario el elevar la altura del corte para
reducir el esfuerzo necesario para empujar la
segadora y para evitar sobrecargar el motor,
dejando montones de recortes de césped.
Para un césped muy pesado, reduzca el an-
cho del corte pasando por encima del lugar
anteriormente cortado y siegue lentamente.
• Ciertos tipos de césped y sus condiciones
pueden exigir que un área tenga que ser
acolchada por segunda vez para esconder
completamente los recortes. Cuando se haga
el segundo corte, siegue atravesado (en
forma perpendicular) a la pasada del primer
corte.
• Cambie su patrón de corte de semana a
semana. Siegue de norte a sur una semana
y luego cambie de este a oeste la próxima
semana. Esto evitará que el césped se
enrede y cambie de dirección.
MAX 1/3
CONSEJOS PARA SEGAR
PRECAUCIÓN: No utilizar dispositivos anti-
paja de la hoja en la segadora ya que estos
accesorios son peligrosos, pueden dañar su
segadora y anular su garantía.
• Bajo ciertas condiciones, tal como césped
muy alto, puede ser necesario el elevar
la altura del corte para reducir el esfuerzo
necesario para empujar la segadora y para
evitar sobrecargar el motor, dejando mon-
tones de recortes de césped. Puede que sea
necesario reducir la velocidad del recorrido
y/o haga funcionar la segadora sobre el área
por segunda vez.
• Para un corte muy pesado, reduzca el ancho
del corte pasando parcialmente por encima
del lugar anteriormente cortado y siegue
lentamente.
• Para un mejor ensacado del césped y para la
mayoría de las condiciones de corte, la velo-
cidad del motor debe ajustarse a la posición
de RÁPIDO.
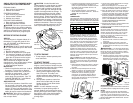
• Los poros en los recogedores de césped de
tela pueden llenarse con mugre y polvo con
el uso y los recogedores recaudarán menos
césped. Para evitar éste, rocíe el recogedor
con la manguera de agua regularmente y
déjelo secarse antes de usarlo.
• Mantenga la parte superior del motor, alred-
edor del arrancador, despejada y sin recortes
de césped y paja. Esto ayudará el fl ujo del
aire del motor y extenderá su duración.
13
LAWN MOWER
Always observe safety rules when per-
form ing any main te nance.
TIRES
• Keep tires free of gasoline, oil, or insect
control chemi cals which can harm rubber.
• Avoid stumps, stones, deep ruts, sharp
objects and other hazards that may
cause tire damage.
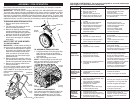
DRIVE WHEELS
Check rear drive wheels each time be fore
you mow to be sure they move freely.
The wheels not turning freely means trash,
grass cuttings, etc. are in the drive wheel area
and must be cleaned to free drive wheels.
If necessary to clean the drive wheels, be
sure to clean both rear wheels.
BLADE CARE
For best results, blade must be kept
sharp. Re place a bent or dam aged blade.
CAUTION: Use only a replacement
blade approved by the manufacturer of
your mower. Using a blade not approved
by the manufacturer of your mower is haz-
ardous, could damage your mower and
void your warranty.
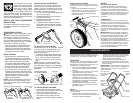
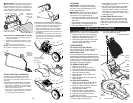
TO REMOVE BLADE
1. Disconnect spark plug wire from spark
plug and place wire where it cannot
come in contact with plug.
2. Turn lawn mower on its side. Make
sure air fi lter and carburetor are up.
3. Use a wood block between blade and
mower hous ing to prevent blade from
turning when re mov ing blade bolt.
NOTE: Protect your hands with gloves
and/or wrap blade with heavy cloth.
4. Remove blade bolt by turning counter-
clockwise.
5. Remove blade & attaching hard ware
(bolt, lock wash er & hardened wash er).
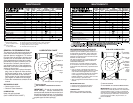
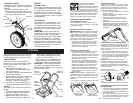
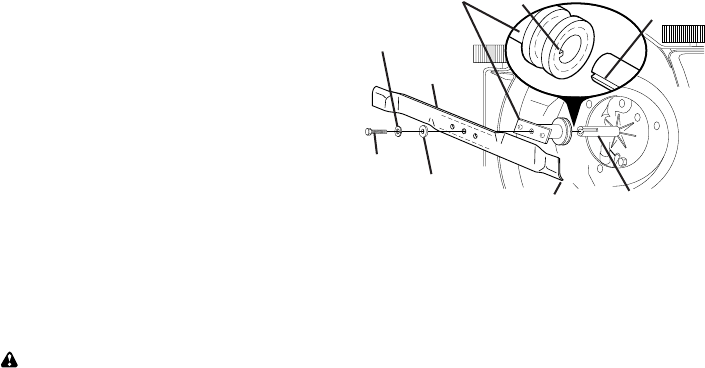
TO REPLACE BLADE
1. Position blade on the blade adapter
aligning the two (2) holes in the blade
with the raised lugs on the adapter.
2. Be sure the trailing edge of blade (oppo-
site sharp edge) is up toward engine.
3. Install the blade bolt with the lock
washer and hardened washer into
blade adapter and crankshaft.
4. Use block of wood between blade and
lawn mower housing and tighten the
blade bolt, turning clockwise.
• The recommended tightening torque is
35-40 ft. lbs.
IMPORTANT: Blade bolt is heat treated.
If bolt needs replacing, replace only with
approved bolt shown in the Repair Parts
section of this manual.
Blade
bolt
Crankshaft
keyway
Hardened
washer
Lockwasher
Blade adapter Key
Blade
Trailing edge
Crankshaft
TO SHARPEN BLADE
NOTE: We do not recommend sharp-
en ing the blade - but if you do, be sure the
blade is balanced. An un bal anced blade
will cause eventual damage to mower or
engine.
• The blade can be sharp ened with a fi le
or on a grinding wheel. Do not attempt
to sharpen while on the mower.
• To check blade balance, drive a nail into
a beam or wall. Leave about one inch of
the straight nail ex posed. Place center
hole of blade over the head of the nail.
If blade is balanced, it should remain in
a horizontal position. If either end of the
blade moves downward, sharpen the
heavy end until the blade is balanced.
GRASS CATCHER
• The grass catcher may be hosed with
water, but must be dry when used.
• Check your grass catcher often for dam-
age or de te ri o ra tion. Through normal
use it will wear. If catcher needs replac-
ing, replace only with ap proved replace-
ment catcher shown in the Repair Parts
section of this manual. Give the lawn
mower model number when ordering.
GEAR CASE
• To keep your drive system working
properly, the gear case and area around
the drive should be kept clean and free
of trash build-up. Clean under the drive
cover twice a season.
• The gear case is fi lled with lubricant to
the proper level at the factory. The only
time the lubricant needs attention is if
service has been performed on the gear
case.
• If lubricant is required, use only Texaco
Starplex Pre mi um 1 Grease, Part No.
750369. Do not substitute.