


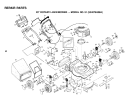

ASSEMBLY
4
CAUTION: Do not operate this mower without the discharge guard or an entire approved grass catcher in place.
These guards are for your protection and are required by the American National Standards Institute and Consumer
Products Safety Commission.
CAUTION: Disconnect spark plug wire from spark plug and place wire where it cannot come in contact with plug.
HOW TO SET UP YOUR LAWN MOWER
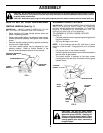
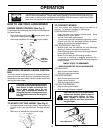
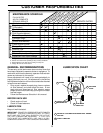
UNFOLD HANDLE (See Fig. 1)
IMPORTANT: UNFOLD HANDLE CAREFULLY SO AS
NOT TO PINCH OR DAMAGE CONTROL CABLES.
• Raise handles until lower handle section locks into
place in operating position.
• Raise upper handle section into place on lower handle,
remove protective padding and tighten both handle
knobs.
• Remove handle padding holding operator presence
control bar to upper handle.
• Your lawn mower handle can be adjusted for your
mowing comfort. Refer to “Adjust Handle” in the
Service and Adjustments section of this manual.
OPERATOR PRESENCE
CONTROL BAR
LIFT UP
OPERATING
POSITION
UPPER HANDLE
LOWER
HANDLE
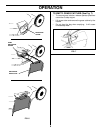
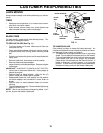
ASSEMBLE GRASS CATCHER
IMPORTANT: YOUR LAWN MOWER IS MULCHER READY
AND THE MULCHER PLATE MUST BE REMOVED
BEFORE USING MOWER AS A BAGGER. TO CONVERT
MOWER TO BAGGING OR DISCHARGING, SEE THE
OPERATION SECTION IN THIS MANUAL.
TO ASSEMBLE & ATTACH GRASS CATCHER
(See Fig. 2)
• Put grass catcher frame into grass bag with rigid part of
bag on the bottom.
• Slip vinyl bindings over frame.
NOTE: If vinyl bindings are too stiff, hold them in warm
water for a few minutes. If bag gets wet, let it dry before
using.
• Lift the rear door on the mower housing.
• Place the grass catcher frame onto the formed tabs on
the rear door hinge bracket.
• The grass catcher is secured to the lawn mower
housing when the rear door is lowered onto the grass
catcher frame.
HINGE
BRACKET
TABS
VINYL
BINDINGS
RIGID BOTTOM
REAR
DOOR
CATCHER
FRAME
CATCHER
FRAME
CAUTION: Do not run lawn mower
without the discharge guard (rear door),
approved grass catcher, clipping de-
flector or mulcher plate in place. Never
attempt to operate mower with the dis-
charge guard (rear door) removed or
propped open.
FIG. 2
FIG. 1