


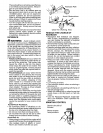
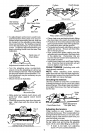
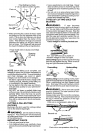


Final (felling) cut here.
2" (5 cm) above center of_otch.
First cut ,5c_ _ /
--, :÷1 /
-- x!". /I
Seco_6 cut___Notch : .... _ 5 cm
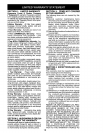
• After removing the cutout of wood, make
the felling cut on the opposite side of the
notch. This is done by making a cut about
two inches higher than the center of the
notch. This will leave enough uncut wood
between the felling cut and the notch to
form a hinge. This hingewill help prevent
the tree from falling in the wrong direction.
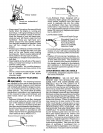
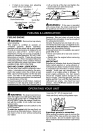
Hinge holds tree on stump and helps
control fall
Opening
of felling
cut
Closing
of
notch
NOTE: Before felling cut is complete, use
wedges to open the cut when necessary to
controlthe directionof fall. To avoid kickback
and chain damage, use wood or plastic
wedges, but never steel or iron wedges.
• Be alert to signs that the tree is ready to fall:
cracking sounds, widening of the felling cut,
or movement in the upper branches.
• As tree starts to fall, stop saw, put it down,
and get away quickly on your planned re-
treat path.
• DO NOT cut down a partially fallen tree
with your saw. Be extremely cautious with
partially fallen trees that may be poorly
supported. When a tree doesn't fall com-
pletely, set the saw aside and pull down the
tree with a cable winch, block and tackle,
or tractor.
CUTTING A FALLEN TREE
(BUCKING)
Bucking is the term used for cutting a fallen
tree to the desired log length.
WARNING: Do not stand on the log
being cut. Any portion can roll causing loss
of footing and control. Do not stand downhill
of the log being cut.
IMPORTANT POINTS
• Cut only one log at a time.
• Cut shattered wood very carefully; sharp
pieces of wood could be flu ng toward oper-
ator.
• Use a sawhorse to cut small logs. Never
allow another person to hold the log while
cutting and never hold the log with your leg
or foot.
• Do not cut in an area where logs, limbs,
and roots are tangled. Drag the logs into a
clear area before cutting by pulling out ex-
posed and cleared logs first.
TYPES OF CUTTING USED FOR
BUCKING
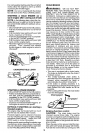
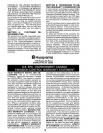
DWARNIN_5: If saw becomes
pinched or hung in a log, don't try to force it
out. You can lose control of the saw resulting
in injury and/or damage to the saw. Stop the
saw, drive a wedge of plastic or wood into the
cut until the saw can be removed easily. Re-
start the saw and carefully reenter the cut.
Do not attempt to restart your saw when it is
pinched or hung in a log.
Use a wedge to remove pinched saw
Turn saw OFF and use a plastic or
wooden wedge to force cut open.
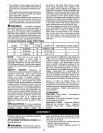
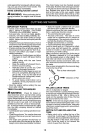
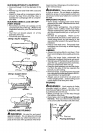
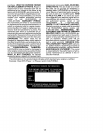
Overcutting beginson thetop sideofthelog
with the saw against the log. When overcut-
ting use light downward pressure.
Overcutting Undercutting
Undercuttinginvolves cutting on the under-
side of the log with top of saw against the log.
When undercutting use light upward pres-
sure. Hold saw firmly and maintain control.
The saw will tend to push back toward you.
_kWARNING: Neverturn saw upside
down to undercut. The saw cannot be con-
trolled in this position.
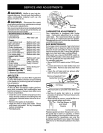
Always make your first cut on the compres-
sion side ofthelog. Thecompression sideof
the log is where the pressure of the log's
weight is concentrated.
First cut on co['npression side of log
Second cut
Second cut
First cut on compression side of log
11