English
20
[170BT/BF] [180BT/BF] (F31)
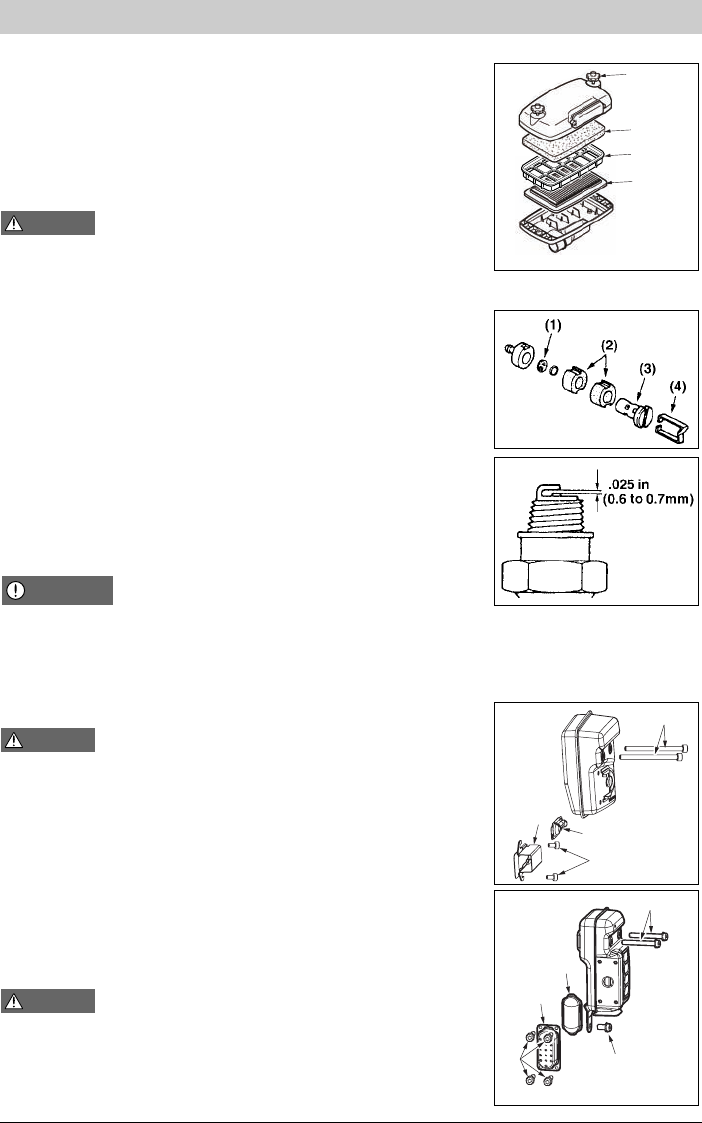
1. Unscrew 2 knob bolts and remove the air cleaner cover. Then remove the
prefilter mounted inside the air cleaner cover.
(1) Knob Bolt (2) Prefilter
(3) Inner Case [180BT/BF] (4) Paper Filter
2. Wash the prefilter in fresh, non flammable cleaning solution (ex. warm soapy
water) and then dry.
(Clean the air filter once in a week.)
3. Exchange the paper filter element with new one in case it has been
contaminated.
WARNING
• This prefilter is dry type.
• Never wash the prefilter in an oily cleaning solution.
• Never include oil in the wash.
• Do not clean the paper filter by tapping on it.
FUEL FILTER
• A clogged fuel filter may cause poor acceleration of the engine. Check
periodically to see if the filter is clogged with dirt. The filter can be taken out
of the fueling port using a small wire hook. Disconnect the filter assembly
from the fuel pipe and unhook the retainer to disassemble it. Clean the
components with gasoline.
(1) Screen (2) Element (x 2)
(3) Holder (4) Retainer
SPARK PLUG
• The spark plug may gather carbon deposits on its firing end with reasonable
use. Remove and inspect the spark plug every 25 hours and clean the
electrodes as necessary with a wire brush. The spark gap should be
adjusted to .025 in (0.6 to 0.7mm).
• Plug manufacturers recommend replacing the plug twice a year to avoid
unexpected plug failure in a job.
REPLACEMENT PLUG IS A NGK CMR7H.
IMPORTANT
• Note that using any spark plugs other than those designated may
result in the engine failing to operate properly or in the engine becom-
ing overheated and damaged.
• To install the spark plug, first turn the plug with your hands until it is
tight, then tighten it a quarter turn more with a socket wrench.
MUFFLER
WARNING
• Periodically inspect the muffler for loose fasteners, damage or corro-
sion. If any sign of exhaust leakage is found, do not use the blower and
have it repaired immediately.
1. Remove the muffler, insert a screwdriver into the vent, and wipe away any
carbon buildup. Wipe away any carbon buildup on the muffler exhaust vent
and cylinder exhaust port at the same time.
2. Tighten all screws, bolts, and fittings.
SPARK ARRESTER
• The muffler is equipped with a spark arrester to prevent red hot carbon from
flying out of the exhaust outlet. Periodically inspect and clean as necessary
with a wire brush.
(1) Bolt (2) Bolt
(3) Spark Arrester (4) Diffuser
WARNING
• Before starting operation, always make sure to check if the muffler is
properly held by the bolts (2).
Fastening Torque: [130BT]
[150BT/BF] [170BT/BF] [180BT/BF]
7 to 11 N·m 8 to 12 N·m
• Also make sure that the spark arrester and the diffuser are properly
attached with the bolts (1). (Fastening Torque : 2 to 3 N·m)
(1)
(2)
(3)
(4)
F31
[170BT/BF] [180BT/BF]
(180BT/BF
ONLY)
F32
F33
(2)
(1)
(2)
(4)
(3)
(2)
(4)
(3)
(1)
F35
F34
[150BT/BF] [170BT/BF] [180BT/BF]
[130BT]
Maintenance


