


Blinks when delay is activated./
Parpadea si se activa retardo (DELAY).
Press to turn all power ON and OFF.
/
Presione aquí para encender y apagar toda
la alimentación eléctrica.
Press to activate the delay feature, press again
to activate the fan./
Presione aquí para activar la función de retardo
,
presione de nuevo para activar el ventilador.
Slide to set delay timer.
/
Deslice esto para ajustar el temporizador
de retardo.
OPERATION/UTILIZACIÓN
Tools Needed./Herramientas necesarias.
Included./Incluidos.
A
B
C
D
E
Estimated Assembly Time: 10 to 20 Minutes
Tiempo de montaje estimado: 10 – 20 minutos
1
2
3
4
Black/Negro
Bare
/
Desnudo
A
A
A
E
White/Black Blanco/NegroWhite/Black Blanco/Negro
5
C
C
6
B
B
D
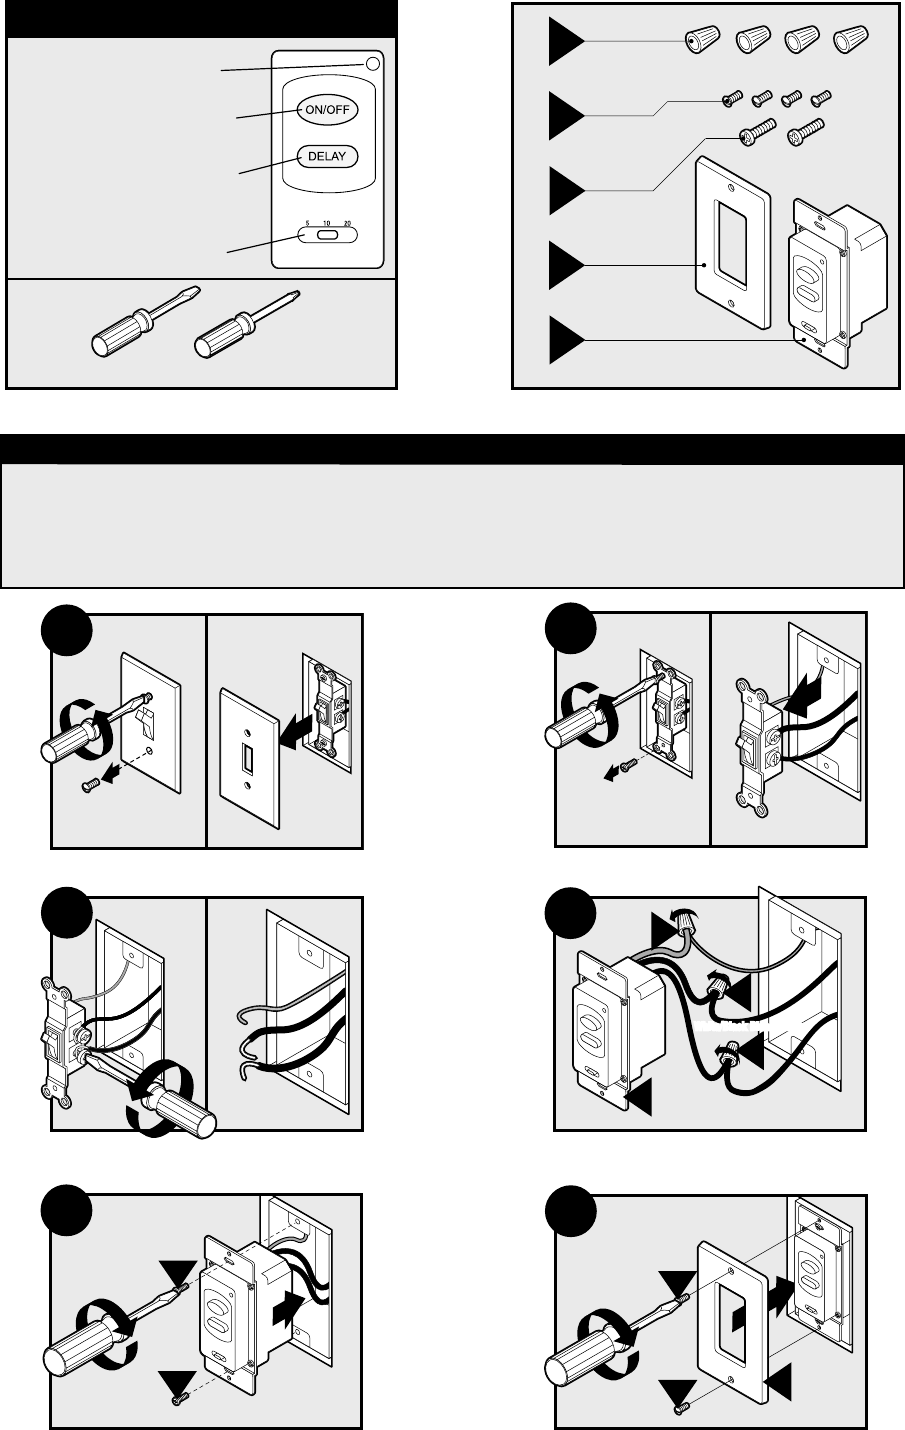
Remove the switch plate./Quite la placa del interruptor.
Remove the light switch./Quite el interruptor de la luz.
Disconnect the light switch wiring./Desconecte los cables
del interruptor de la luz.
Connect wires as shown./
Conecte los alambres como se muestra.
Fasten the control to the switch box./
Atornille el control a la caja de interruptor.
Replace the switch plate. Restore power./
Coloque de nuevo la placa del interruptor.
Restablezca la alimentación eléctrica.
NOTES/NOTAS
This wall control unit may be used with any brand of bath fan (125 A max).
If you have a bath fan with a light or night-light, the light and the night-light
must be wired on a separate switch or the light and the night-light will be
disabled./
Esta unidad de control de pared se puede utilizar con cualquier marca de
ventilador de baño
(125 A max)
. Si usted tiene un ventilador de baño con una luz o una
luz nocturna, los cables de dicha luz o luz nocturna se deben conectar a un interruptor
independiente o dicha luz o luz nocturna quedará desactivada.
To access/replace the battery–Para acceder a la pila o cambiarla:
1. Remove the switch plate (do not remove the control from the switch box).
2. Remove the control faceplate from the wall by pressing both sides
3. The battery is on the back of the control faceplate
1. Quite la placa del interruptor (no saque el control de la caja del interruptor).
2. Quite de la pared la placa frontal del control presionando en ambos lados.
3. La pila está en la parte trasera de la placa frontal del control.