


13
13
the temperature sensor) and the main unit within the effective
transmission range of 100 feet (30 meters).
• The remote rain gauge must be placed outdoors on the open
area, away from the walls, fences and trees and level.
• It is important that excess precipitation can freely flow from the
remote rain gauge.
• The remote temperature sensor can be placed indoors or
outdoors, depending on the area where the temperature is
intended to be measured. If you intend measuring outdoor
temperature, place the remote temperature sensor outdoors.
• The main unit must be placed indoors.
NOTE:
1. Avoid pressing any buttons on the main unit before the remote
rainfall and temperature data are displayed.
2. The effective operating range may be influenced by the surrounding
building materials and how the receiver (main unit) and transmitters
(remote rain gauge and temperature sensor) are positioned.
3. Place the remote rain gauge and temperature sensor so that it faces
the main unit (receiver), minimizing obstructions such as doors, walls, and
furniture.
4. Though the remote temperature sensors are weather-resistant, they
should be placed away from direct sunlight, rain or snow. The best
suggested location for the remote temperature sensor for outdoors is
under the eave on the north side of the building.
NOTE: When the temperature falls below freezing, the batteries in the
remote rain gauge and outdoor remote temperature sensor may have
reduced voltage supply and a shorter effective range. We recommend
using lithium batteries at temperatures of 32°F (0°C) and below.
We also recommend covering the remote rain gauge tightly with a plastic
14
during the winter time or move it indoors.
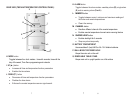
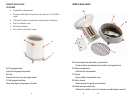
BATTERY INSTALLATION
REMOTE RAIN GAUGE
• Unlock the funnel-shaped top on the rain gauge by turning both
knobs on the sides in an anti-clockwise direction.
• Remove the funnel-shaped top lifting it off the rain gauge bucket.
• Remove 7 small screws from the battery compartment cover
using a small Phillips screwdriver.
• Insert 2 “AA” size alkaline batteries (not included), matching the
polarities as shown in the battery compartment.
• Replace the battery compartment door and secure the screws.
• Insert the funnel-shaped top into the rain gauge bucket and
secure it into place by turning the knobs clockwise.
RAIN GAUGE PLACEMENT TIPS
• Make sure that the remote rain gauge is level – check if the ball
bearing inside the bucket is at the midpoint of the leveler.
• Place the protective screen over the top to protect the rain gauge
from the debris.
• Mount the rain gauge using mounting hardware provided.
• Make sure that the rain gauge is in open area where precipitation
falls directly into the gauge’s bucket, ideally 2-3 feet above the
ground.