


8
ASSEMBLY
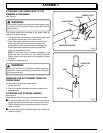
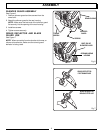
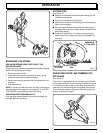
FRONT HANDLE
See Figure 4.
A barrier handle should be used for ensuring the best
control and maximising operator safety.
1. Hold the top and bottom clamp snugly in position on the
shaft housing so that handle will be located to the
operator’s left.
2. Insert the end of the handle between the clamps.
3. Align the bolt holes and push the long bolt
(1/4-20 x 1 1/2 in) through the handle side.
4. Place short bolt (1/4-20 x 1 in) through opposite side of
clamp. Install flat washer, lock washers and hex nuts to
hold the assembly in place.
5. After assembly is complete, adjust the position of the
handle for best balance and comfort.
6. Tighten first the long bolt and then the short bolt.
7. Connect the shoulder strap to the strap hanger adjust to
a comfortable position.
NOTE: Do not attempt to remove or modify the spacer.
This spacer limits the upper position of the handle grip.
See Figure 4.
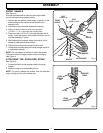
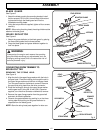
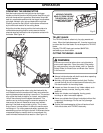
ATTACHING THE SHOULDER STRAP
See Figure 5.
1. Connect the latch on the shoulder strap to the strap
hanger.
2. Adjust the strap to a comfortable position.
NOTE: To quickly release the product from the shoulder
strap, sharply pull the quick release tab.
Fig. 4
CLAMP
FRONT
HANDLE
FLAT WASHER
LOCK WASHER
HEX NUT
STRAP
HANGER
BOLT
1/4-20 x 1 1/2 in.
BOLT
1/4-20 x 1 in
SPACER
CLAMP
SHOULDER
STRAP
LATCH
STRAP
HANGER
QUICK
RELEASE
TAB
Fig. 5