


Page 8 — English
OPERATION
WARNING:
Do not allow familiarity with product to make you careless.
Remember that a careless fraction of a second is
sufficient to inflict serious injury.
WARNING:
Always wear eye protection with side shields marked to
comply with ANSI Z87.1. Failure to do so could result in
objects being thrown into your eyes, resulting in possible
serious injury.
WARNING:
Do not use any attachments or accessories not
recommended by the manufacturer of this product. The use of
attachments or accessories not recommended can result
in serious personal injury.
APPLICATIONS
You may use this product for the purpose listed below:
Trimming grass and other light weeds
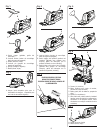
CHARGING THE GRASS SHEAR
See Figure 2.
This tool has been shipped in a low charge condition to prevent
possible problems. Therefore, you should charge it overnight
prior to use. After each use, charge for at least 8 hours.
To charge:
Stop the motor.
Install padlock (not included) or lock-out pin into switch
trigger hole. Keep both hands away from switch.
Insert charger plug into input jack making sure they are
properly connected.
Charger can be used with normal household voltage
of 120 volts, AC only, 60 Hz.
Connect charger to power supply.
Do not place charger in an area of extreme heat or cold.
It will work best at normal room temperature.
LOCK-OUT BUTTON
See Figure 3.
The lock-out button reduces the possibility of accidental
starting. The lock-out button is located on the handle above
the switch trigger. The lock-out button must be depressed
before you pull the switch trigger. The lock-out button resets
each time the switch trigger is released.
SWITCH TRIGGER
See Figure 3.
To prevent unauthorized use or accidental starting of the
grass shear, disconnect it from the charger and lock the
switch in the off position. To lock the switch, install a pad-
lock (not included) or lock-out pin through the hole in the
switch trigger. A padlock with a long shackle up to 9/32 in.
diameter may be used. When the padlock is installed and
locked, the switch is inoperable. Store the padlock key in
another location.
NOTE: The lock-out pin does not protect against unauthorized
usage. Only a locked padlock with the key stored in another
location can prevent unauthorized use of the grass shear.
STARTING AND STOPPING
See Figure 3.
To start:
Remove padlock (not provided) or lock-out pin from
switch trigger.
Depress the lock-out button.
Depress the switch trigger.
To stop:
Release the switch trigger.
Install padlock (not provided) or lock-out pin.
CUTTING TIPS
See Figures 4.
DANGER:
Never cut near electric cords or lines. If blade jams on
any electrical cord or line, DO NOT TOUCH THE BLADE!
IT CAN BECOME ELECTRICALLY LIVE AND VERY
DANGEROUS. Continue to hold the grass shear by the
handle or lay it down and away from you in a safe manner.
Disconnect the electrical service to the damaged line or
cord before attempting to free the blade from the line or
cord. Contact with the blade, other conductive parts of
the grass shear, or live electric cords or lines will result in
death by electrocution or serious injury.
WARNING:
Clear the area to be cut before each use. Remove all
objects such as cords, lights, wire, or loose string which
can become entangled in the cutting blade and create a
risk of serious personal injury.
Do not force the grass shear through heavy grass. This
can cause the blades to bind and slow down. If the blades
slow down, reduce the pace.
If blades do become jammed, stop the motor, allow the
blades to stop, and install padlock (not included) or lock-out
pin into switch trigger hole before attempting to remove
the obstruction.