


Page 13
WARNING:
Use only identical Homelite replacement parts when
servicing this product. Use of any other parts may
create a hazard or cause product damage.
CLEANING THE TRIMMER
Release the trigger, allow the trimmer to coast to a stop,
and unplug the trimmer before cleaning.
Clean the exterior of the trimmer with a soft, dry
cloth.
Avoid using solvents when cleaning plastic parts.
Most plastics are susceptible to damage from
various types of commercial solvents and may be
damaged by their use.
Wipe or scrape the trimmer head and spool area
when they accumulate dirt or clippings.
Scrape or brush debris away from air intake vents on
the motor housing.
SERVICING THE TRIMMER
Check all fasteners and tighten as necessary. If any
part is damaged or lost, repair it or replace it.
Any other service should be performed at a Homelite
Authorized Service Dealer.
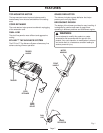
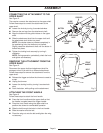
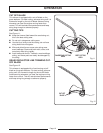
REPLACING THE CUTTING LINE
See Figures 13, 13a and 13b.
WARNING:
Use of line other than the original .080 in. monofila-
ment cutting line could cause serious personal injury
or damage to the trimmer.
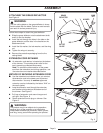
Follow these steps to replace the cutting line.
Release the trigger and allow the trimmer to coast to
a stop.
Unplug the trimmer.
WARNING:
Make sure the trimmer head stops rotating when you
release the trigger. Contact with a rotating trimmer
head could cause personal injury.
Remove the retaining cap by turning it counterclock-
wise.
Remove the empty spool.
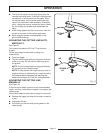
Clean the trimmer head thoroughly. Inspect the
trimmer head for any damaged or worn parts.
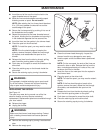
Cut two pieces of line approximately 9 ft. (2.7 m)
long.
Fig. 13a
UPPER AREA
LOWER AREA
MAINTENANCE
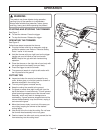
Fig. 13b
RETAINING
CAP
TRIMMER
HEAD
SPOOL
Fig. 13