


English
20
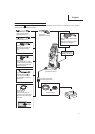
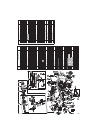
1. Attaching the strainer to the suction hose (Fig. 15)
(1) Pass the suction hose through the hose band supplied
and then gently moisten the inside of the suction hose
with water.
(2) Insert the strainer as far as it will go, and then fi rmly
tighten the hose band with a fl at-headed screwdriver.
2. Attaching the one-touch joint (black) to the suction
hose (Fig. 16)
Attach the one-touch joint (black) supplied as a standard
accessory to the suction hose.
3. Starting the suction hose water suction process
(Fig. 17)
Sink the strainer hose set into a container fi lled with
water.
Start o the suction process (introduce water to the
suction hose.)
NOTE
Do not use anything other than clean water (river or pond
water, muddy water containing sand granules.)
Failure to observe this may result in malfunctions.
Set the switch at “ON” without the nozzle attached.
Failure to observe this may result in dry operations,
leading to malfunctions.
4. Insert the one-touch joint into the water feed
connector (Fig. 18)
Withdraw the one-touch joint from the accumulated water
and insert it into the water feed connector on the washer
while making sure that the water inside the hose does not
escape.
5. Check to make sure the water is fl owing out
(Fig. 19)
(1) Connect the trigger gun from which the nozzle has been
removed to the high-pressure hose.
(2) Plug in the power socket and set the switch to “ON”.
(3) Pull the trigger gun’s trigger, and then set the switch to
“OFF” after checking that su cient water is fl owing out.
6. Attach the nozzle.
NOTE
Set the switch at “OFF” if water does not fl ow out within
two minutes.
Failure to observe this may result in malfunctions (dry
operations.)
7. Washing
Set the switch at “ON” and pull the trigger gun’s trigger to
commence washing.
8. Cleaning
Remove all dirt from the strainer’s grill, wash it with water
and store it after it has dried.
WASHING
WARNING
Do not switch the washer on while the trigger is being
pulled.
Failure to observe this may result in high-pressure water
being sprayed immediately, leading to unexpected
accidents.
Do not point the nozzle at people or animals.
Failure to observe this may result in injury.
CAUTION
Set the switch to “OFF” immediately if the hose becomes
detached from the faucet or washer, and if water is no
longer being fed to the washer.
Failure to observe this may result in immediate
malfunctions (dry operations.)
Set the switch to “OFF” without fail when temporarily
suspending operations.
Failure to observe this may result in the motor
automatically starting up.
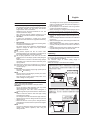
Place your fi nger in the center of the trigger during
operations (Fig. 20)
Failure to observe this may result in injury from pinched
fi ngers.
Grip the gun and nozzle fi rmly with both hands.
The trigger gun may kick back when water is discharged.
NOTE
Do not use the water hose when it is wound onto the reel.
Failure to observe this may result in insu cient water
feed.
Commence initial washing approximately 2 to 3 meters
away from the targeted item, and then move gradually
closer while checking the level of cleaning until you reach
a distance in which soiling is e ectively washed away.
The pressure of the spray from the washer is
approximately 20-times greater than tap water. High-
pressure water jets may therefore damage or peel the
coating from the items being washed.
There are cases when the water spray will appear
unstable owing to the fact that air that has built up in
the pump and hose is purged together with the water
immediately after use. In this event, allow the water to
fl ow out until it stabilizes.
Leave two or more seconds gap between pulling and
releasing the trigger.
Failure to observe this may result in the pressure switch
malfunctions.
Do not use the washer for more than thirty consecutive
minutes without giving it a break.
1. Open the faucet to its fullest.
Point the nozzle in a safe direction and then fully open the
faucet. Check to make sure no water is leaking from the
joints.
Release the trigger stopper with the washer switched o ,
pull the trigger on the trigger gun to discharge a small
amount of water from the nozzle with just the pressure
from the tap water. Check to make sure that no water is
leaking.
NOTE
Do not switch the washer on with the faucet turned o .
Failure to observe this may result in malfunctions.
2. Set the switch to the “ON” position (Fig. 21)
The motor will start operating when the washer is
switched on. The motor will automatically switch o once
su cient water pressure has built up inside the washer.
3. Pull the trigger (Fig. 22)
Hold the trigger gun fi rmly in both hands, point the nozzle
at the item to be washed, and then pull the trigger.
The high-pressure water jet will spray out.
Adjust the nozzle between “Jet” and “Spray” in
accordance with need.
Trigger stopper (Fig. 23)
The trigger gun is fi tted with a trigger stopper to prevent
the trigger from being pulled.
The trigger is locked and released by pressing the
stopper in the direction shown by the arrows.
NOTE
Lock the trigger with the trigger stopper during pauses
and after washing has been completed.